Staff member profile
The staff member must be selected via the member selection drop down in TimePunch PRO. After selecting the member a click to the staff symbol opens the staff member profile dialog.

As an alternative the profiles can be management with “Master data / staff member profiles”.
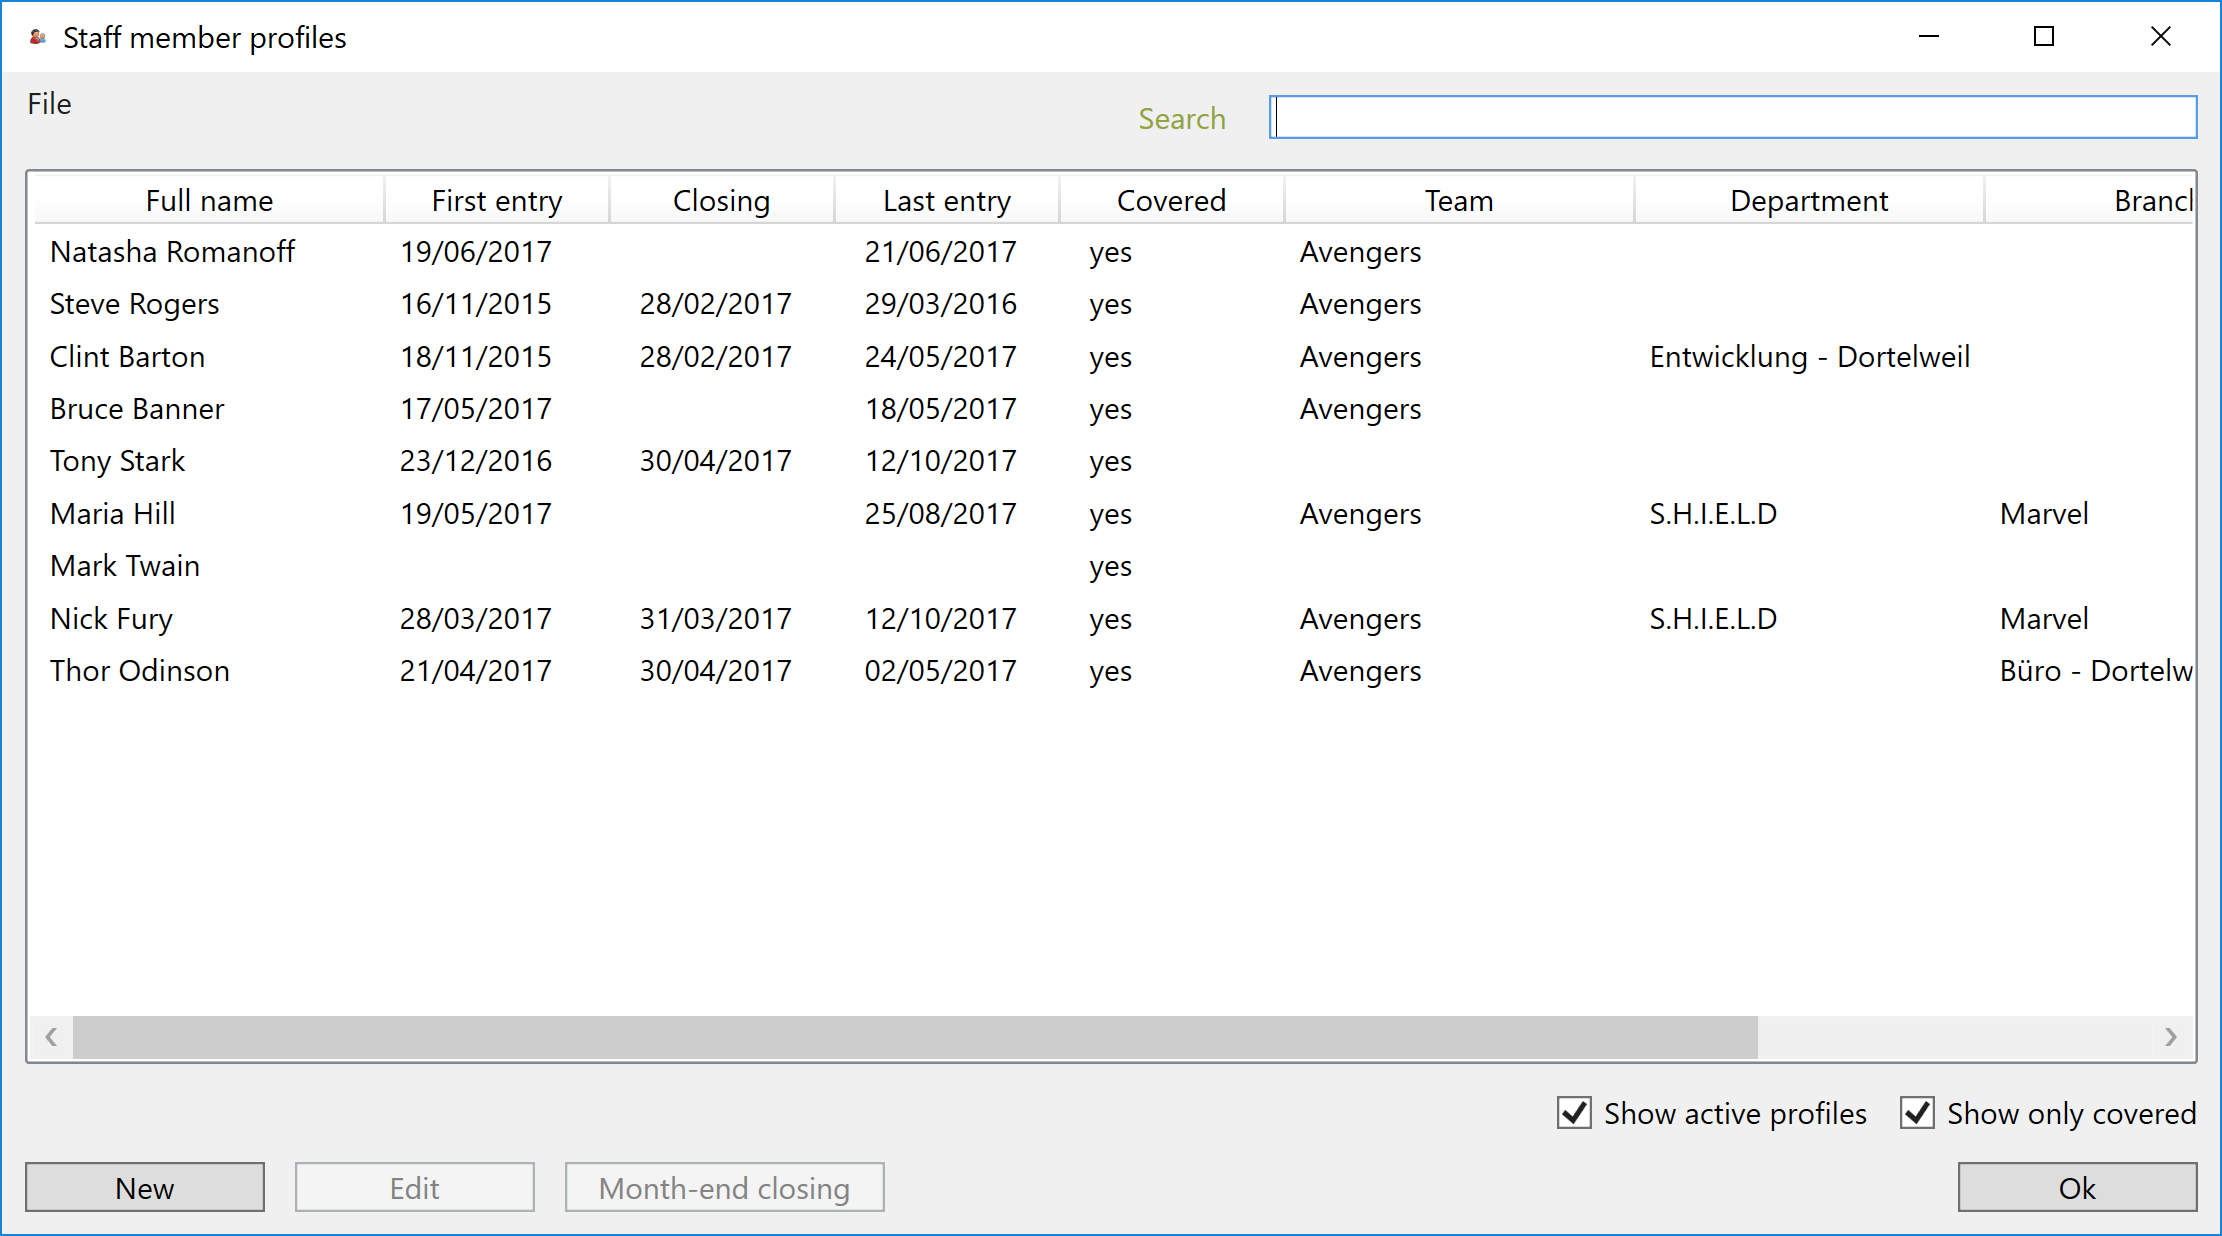
By using the “Edit” button or with a double click at the profile the dialog to manage the user profile gets opened. The dialog consists of four areas – the work contract, the working time and the starting data and the management.
Important: The column “Covered” shows if the member profile gets covered by the current user. Covered means not necessarily that the profile is editable by the user. It’s more an indicator that the member is part of a group (e.g. Team / Department / Branch) that is managed by the user. Therefore, the user is set as a group leader or assistant. The effective rights are derived by the permissions of the current user.
Switch, Display Active Employee Profiles: If this switch is set, only the active employee profiles are displayed. Employees who have already been dismissed are hidden.
Switch, Assigned Employees: If this switch is set, only the managed employee profiles are displayed. This makes it easier to find the employees that can be edited.
Create a new staff member
By using the button “New” a new staff member can be created in TimePunch. Therefore, the logon and the fore –and sure name of the staff member is necessary.
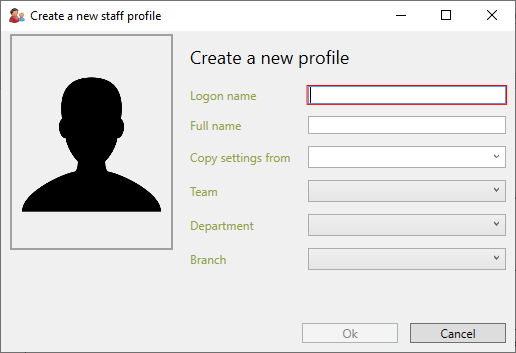
By using the selection list “Copy settings from” an already existing profile can be selected. If a profile has been selected, the working time model, the public holiday settings and flexi time account rules will be copied. This saves a lot of time when creating the initial member profiles.
If a team, department or branch office has been selected, the employee is immediately assigned to the corresponding groups.
This also enables employees with personnel management rights to maintain the new employee directly, provided the creating user has a management function in one of the selected groups.
Personal data
At the first page the personal data of the staff member gets defined.
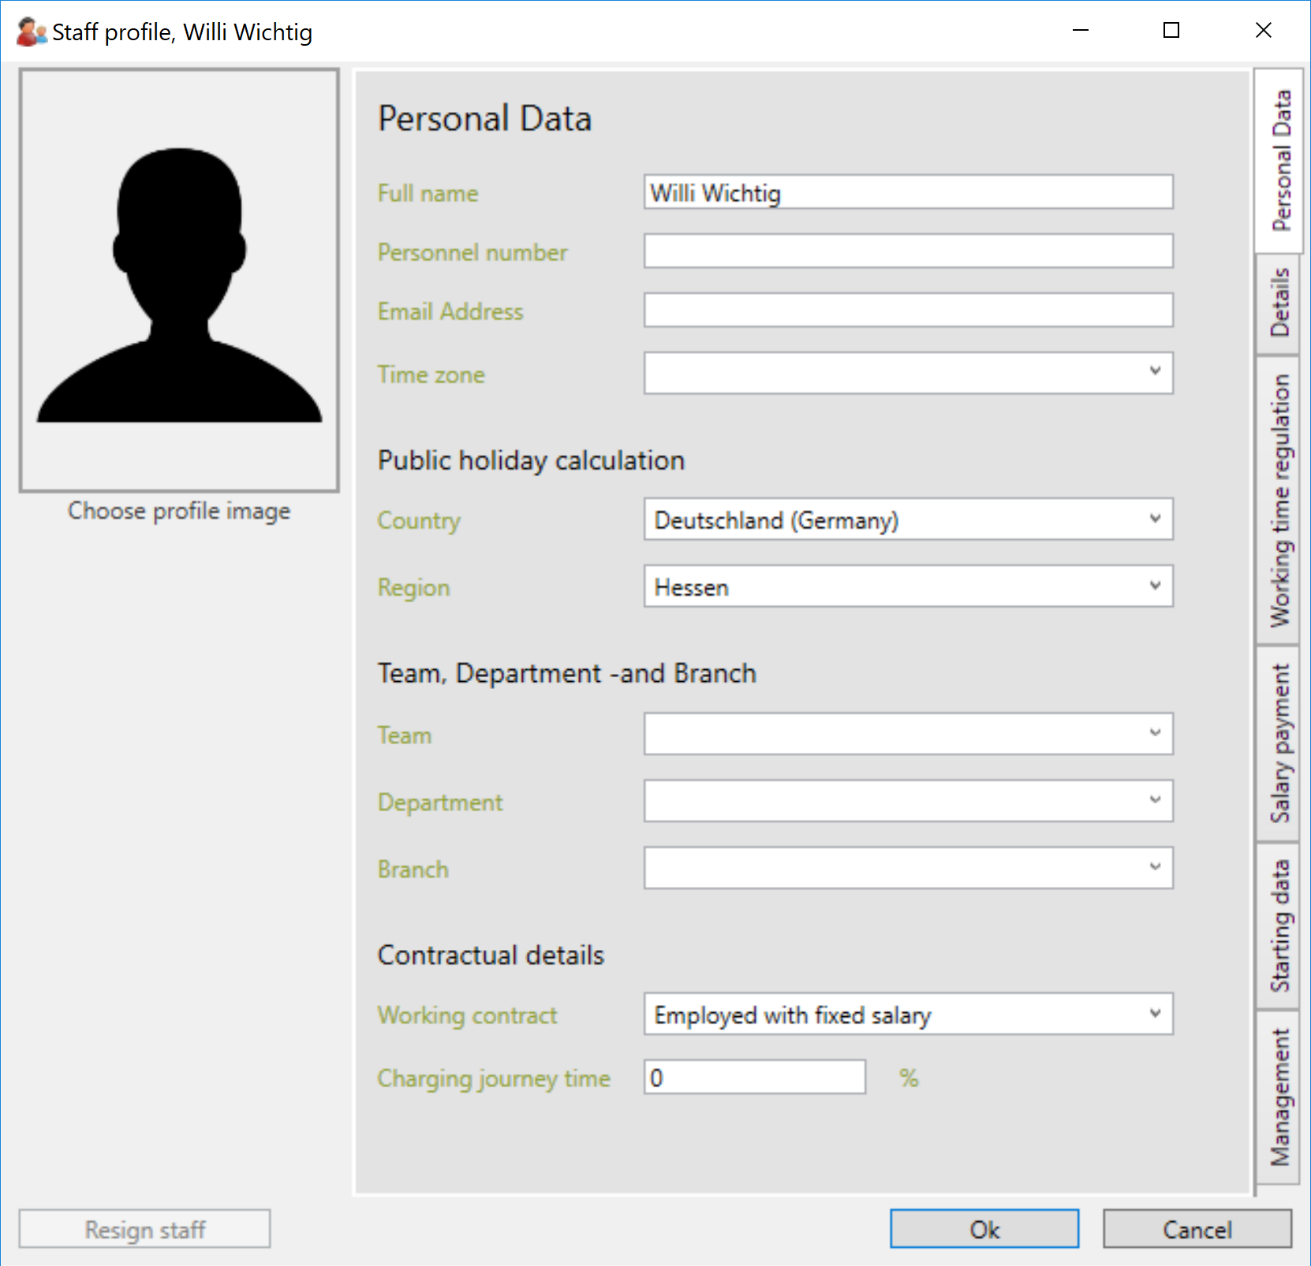
Personal data includes personal data (personnel number, first and last name and e-mail address). In addition, the state and state can be defined as a basis for the calculation of public holidays.
Team membership, departmental and branch membership defines the employee's membership in the various groups. You maintain groups in the "Master data" menu.
Note: The group displayed directly for the employee (team, department, branch) is the respective primary group. The primary group decides which managers approves the absence requests. Only group leaders/assistants in the respective assigned primary groups are asked for absence requests. All other group leaders are only informed about the absence.
Finally, the contractual details must be determined. A distinction is made here between "employees with a fixed salary", "employees with hourly wages", "employees with hourly wages (regular public holiday work)" and pure time recording without flextime calculation.
Use the button "Select profile image" to define any JPG or PNG file as profile image. This screen appears when you log on and is used to visually distinguish employees.
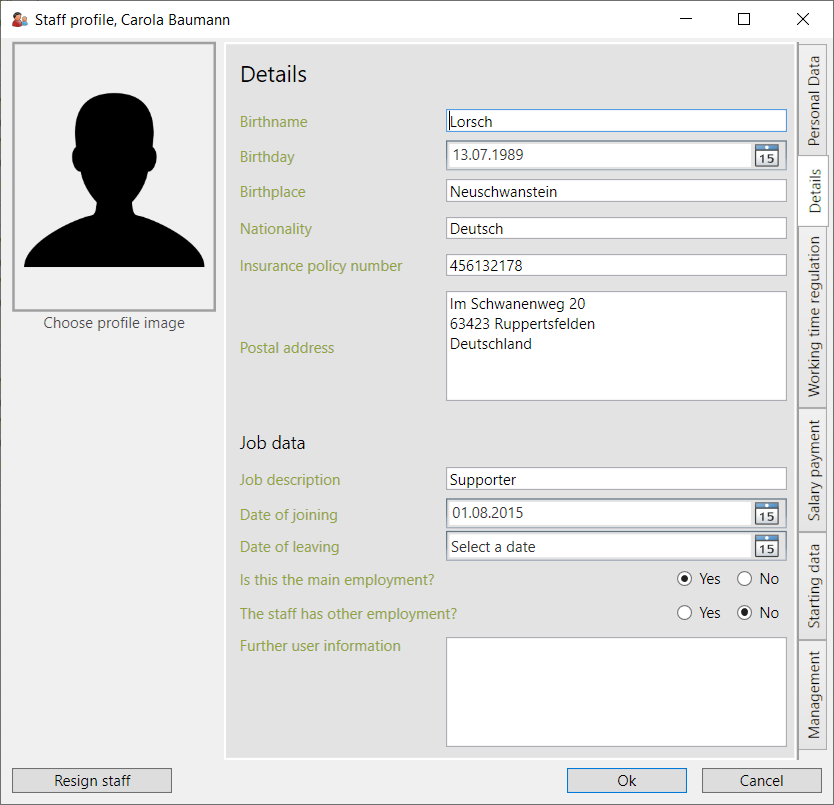
Sensitive detailed data
In the second tab "Details", sensitive employee data is displayed and edited. This data is only displayed to the employee with the "Personnel Management" and/or "Administration" rights.
Working time regulation
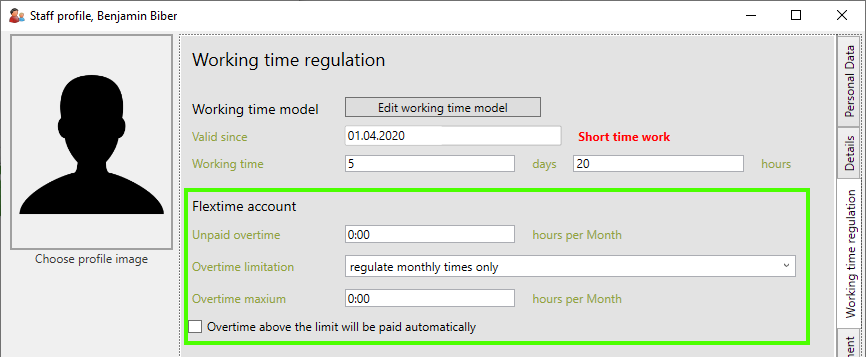
At the second page “Working time regulation” the settings that applies to the flexi time account can be set.
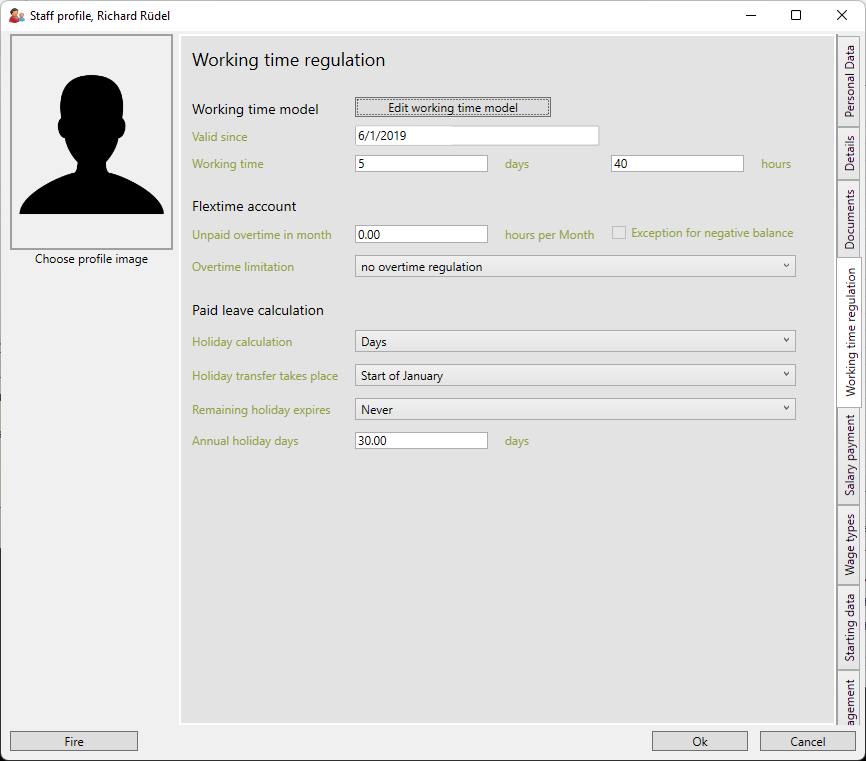
Important: This data always refer to the current month the upcoming ones. If data shall be changed in previous months, e.g. the public holiday settings, then this needs to be done in the analysis field of the TimePunch main screen.
Working time models
Using the button “Edit working time model” a dialog opens which can be used to edit the working time models.
Important: The working week stems from the working time model and cannot be changed in the profile.
Start of work
The start of work has no effect on the work to be performed. However, if the employee does not clock out, the theoretical clock-out date is calculated from the work start and the planned hours. This is only in case the employee does not clock out himself.
Working time
This field contains the target number of hours to be worked on the defined day.
Working time credit/deduction
In this field, a daily working time credit or deduction can be defined. Depending on whether the time is entered in plus as a credit or negative as a deduction.
Booked as
This field defines whether a half day or a full day should be deducted from the leave account when a leave is booked.
Begin and end of core time
If core working hours are defined, they can be entered here. Core working hours are working hours during which the employee must be present.
Dynamic target time
A dynamic target time can be stored in the working time model. This means that the daily target time is set equal to the actual working time. This can be useful if it is not known in advance how long the employee will work. This is very helpful, for example, in the case of short-time work.
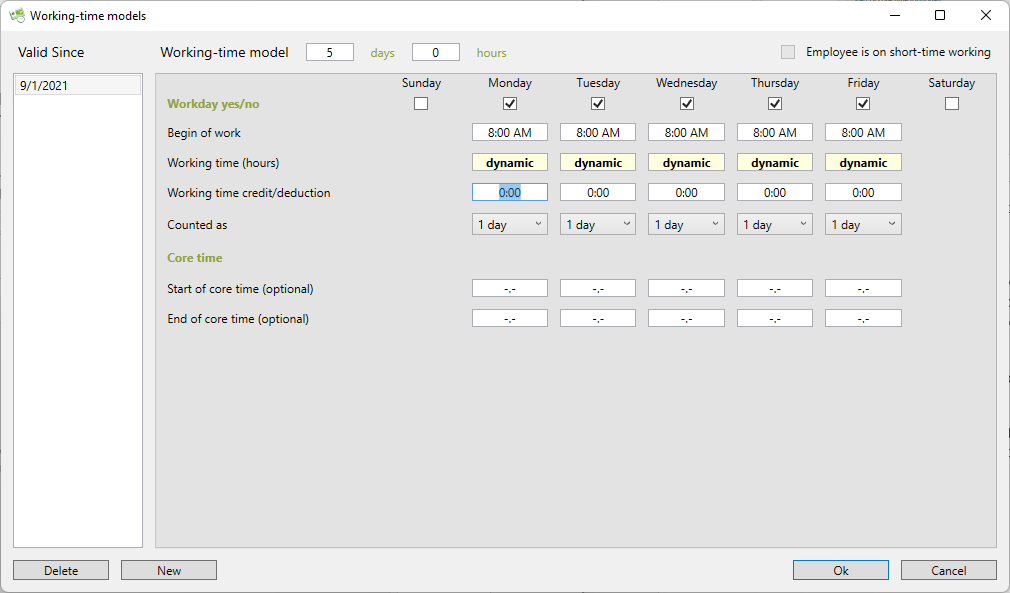
The dynamic is activated by deleting the target time field completely. When switching to another field, the text "dynamic" is then displayed in the target time field (working time hours). This makes the target time equal to the actual working time.
Flexi time account
At the flexi time account area the overtime calculation will be defined. At first this means the overtime that is compensated with the employee’s contract. That means it can be defined from which amount of work it will be counted as overtime.
On request, the overtime can be limited per month or a total. This can be done with the second selection:
“Regulate accumulated overtimes” means that the employee can only have a limited overtime in total.
“Regulate monthly times only” means that the employee can only have a limited amount of overtime in month, but in total unlimited.
All working hours that are done beyond the limitation will be cut or paid out automatically, if the checkbox at “Overtime above the limit will be paid automatically” has been set.
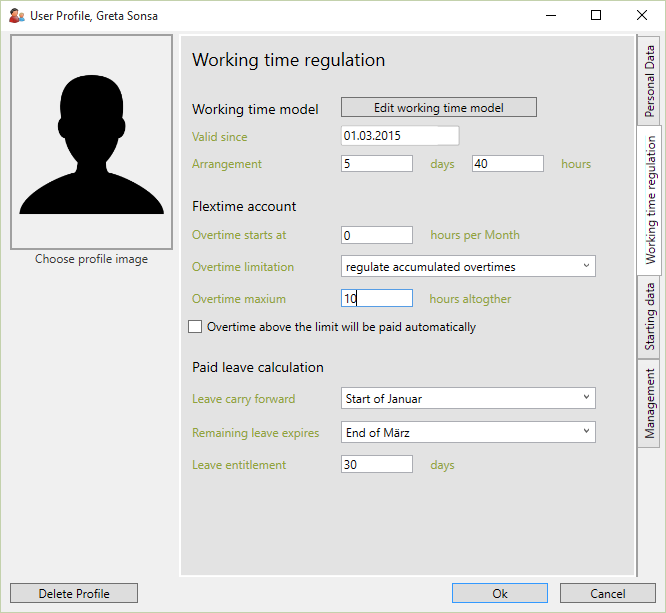
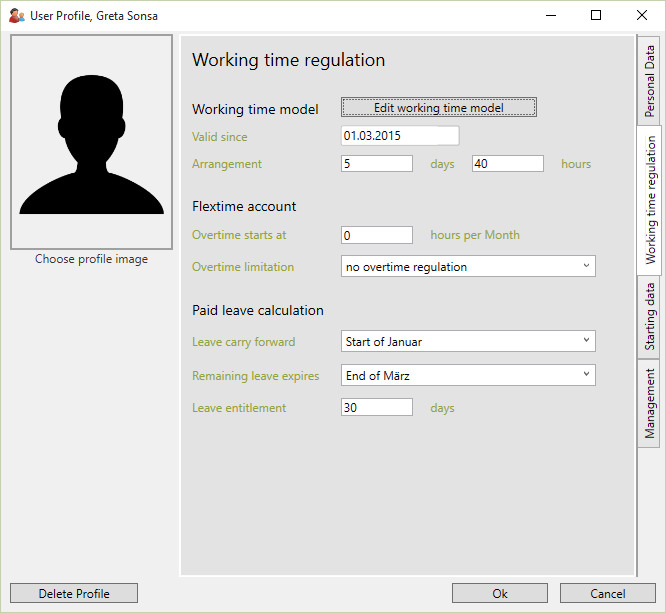
Paid leave calculation
The leave rules can be defined in this area. The following settings are possible:
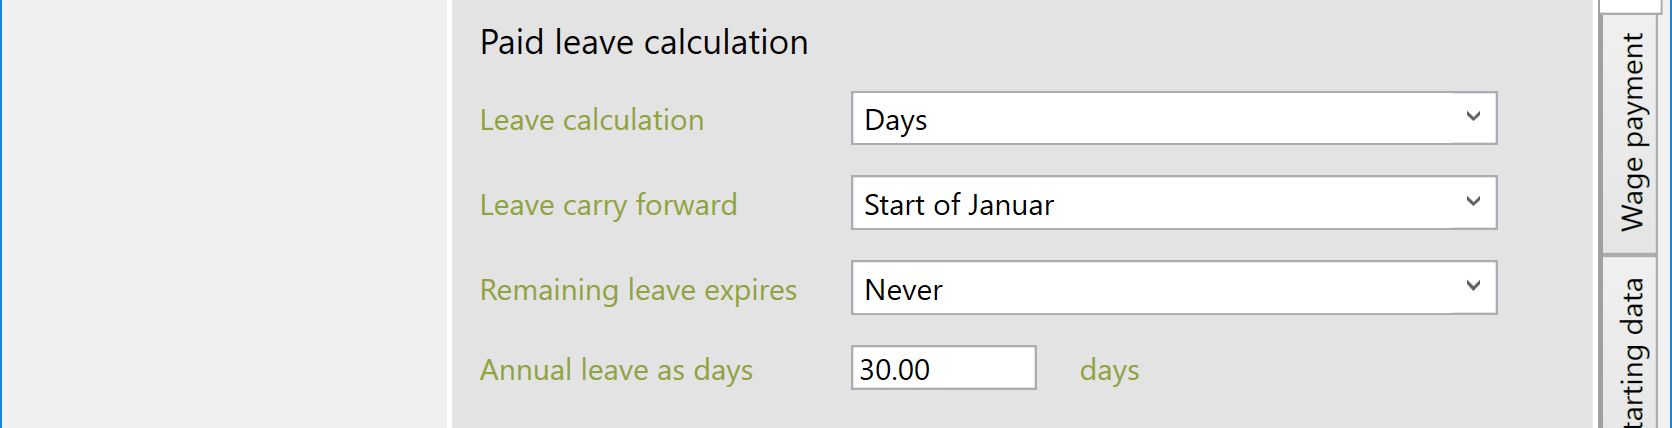
Calculation base (days / hours): According to your wishes, the annual holiday can be calculated in days or hours. If the working time model is regularly stored with full and half days, the calculation basis for days is recommended, as this variant is easier for the employee to understand.
In the case of irregular working time models, payroll is more accurate on an hourly basis, since the leave account is only debited with actual leave hours.
Vacation carryover takes place (beginning of month): In this area, you select the month in which the holiday carryover is to take place. In Germany, annual leave is usually credited at the beginning of January. In Austria, however, leave is credited on the employee's entry date. In this case, the month of the entry date can be selected as the time to credit the employee's annual leave to his or her leave account.
Remaining leave expires (beginning of month): The second setting is defined as the time at which the remaining leave of the previous year expires. Here, too, there are different regulations in every company that can range from immediate to never.
The annual vacation days must be the contractually agreed vacation days. If the employee does not start at the beginning of the year, the remaining days of leave are to be defined in the "Initial data" tab in the first year.
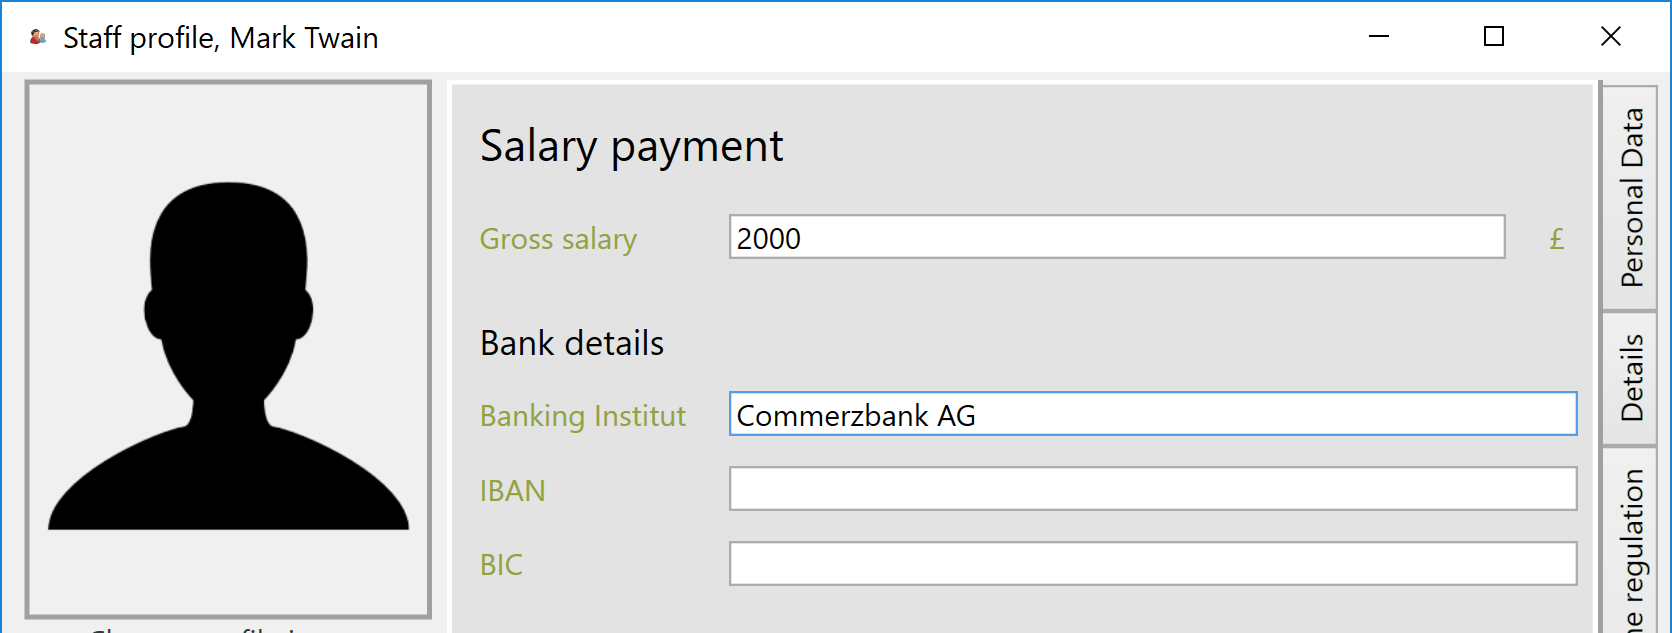
Payroll accounting
Depending on whether the employee works on the basis of a fixed salary or an hourly wage, the register with the payment data for wage or salary is displayed.
Billing with fixed salary
The dialog for payroll according to fixed salary contains the employee's monthly gross salary and bank details.
Accounting on the basis of hourly wages
This dialog box contains the payroll data if the employee is paid by hourly wage.
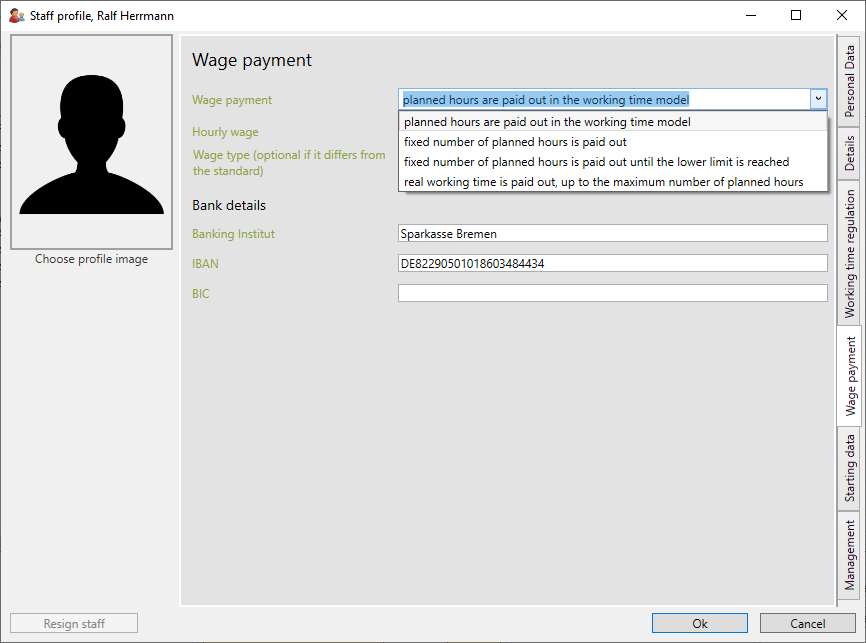
Possible types of wage payment
In TimePunch, there are several ways in which wages are paid and according to which rules.
These can be defined in the employee profile in the "Wage payment" tab.
Planned hours are paid out in the working time model
The wage paid is based on the employee's planned working time, as defined in the working time model. This means that for a month with 31 days, the employee receives a higher wage than for a short month with only 30 or 28 days.
Fixed number of planned hours are paid out
The number of paid hours is always identical and fixed. This type of wage payment is often used by companies that always pay their employees the same number of hours.
To calculate the average monthly hours, the weekly working time should be multiplied by 4.33. The weekly working time should be calculated by multiplying the weekly working time by 4.33.
The figure 4.33 is calculated by dividing the 52 weeks of the year by the 12 months of the year. [ 52 / 12 = 4,33 ]
Example: 37.5 hours a week = 37.5 * 4.33 = 162.37 hours a month
This ensures that the employee builds up overtime in long months, which he can then reduce in short months.
Fixed number of planned hours are paid out, until the lower limit is reached
This payout is identical to the previous one. The difference, however, is that the payout is made only until the overtime (or absenteeism) reaches a lower limit.
This means that the employee can only receive wages until his or her overtime account reaches the lower limit.
For example, if the employee must always have a flexitime account of +50 hours, the wage payment is reduced if the employee's hours account would otherwise fall below this lower limit.
A limit of 0 hours, for example, would also be possible. In this case, a seasonal worker, for example, is paid wages in winter until his or her hour account falls to 0.
Real working time is paid out, up to the maximum number of planned hours
The number of hours paid out is variable and depends on the employee's actual working time.
This setting is particularly interesting for part-time employees. The maximum number of hours can be calculated here, for example, by dividing the 450 € by the hourly wage. This gives you the maximum working time per month that can be paid to the employee.
If the employee works more, these hours are credited to the overtime account. The overtime accumulated there can then be paid out manually at a later date or booked out as time off.
Billing according to hourly wage, without a fixed working time model
In the special case where an employee is paid according to a fixed hourly wage but does not have a fixed working time model, all weekdays must be stored with 0 hours of working time in the weekly working time model.
This is the case, for example, with a temporary worker or a working student who is always paid a fixed number of hours per month, but who must or can work on days that have not been specified beforehand.
In this case, the wage payment should be stored in the employee profile with a fixed number of planned hours and the working time model should be zeroed.
Payroll according to hourly wage (regular public holiday work)
Payroll according to hourly wages with regular public holiday work means that public holidays are not automatically regarded as being free of work. An example of this is an employment relationship as a shift worker.
Shift workers are permitted to take the working time released by the public holiday as special leave on a day other than the public holiday. Therefore, with this setting, the public holiday is displayed as a regular working day with the corresponding target time.
Accounting according to hourly wages (regular work on public holidays)
The standard wage types and times used by TimePunch are created in "Extras / Options".
If the wage types used for an employee differ, employee-specific wage types can also be stored directly for the employee. The "Wage types" tab page is used for this purpose.
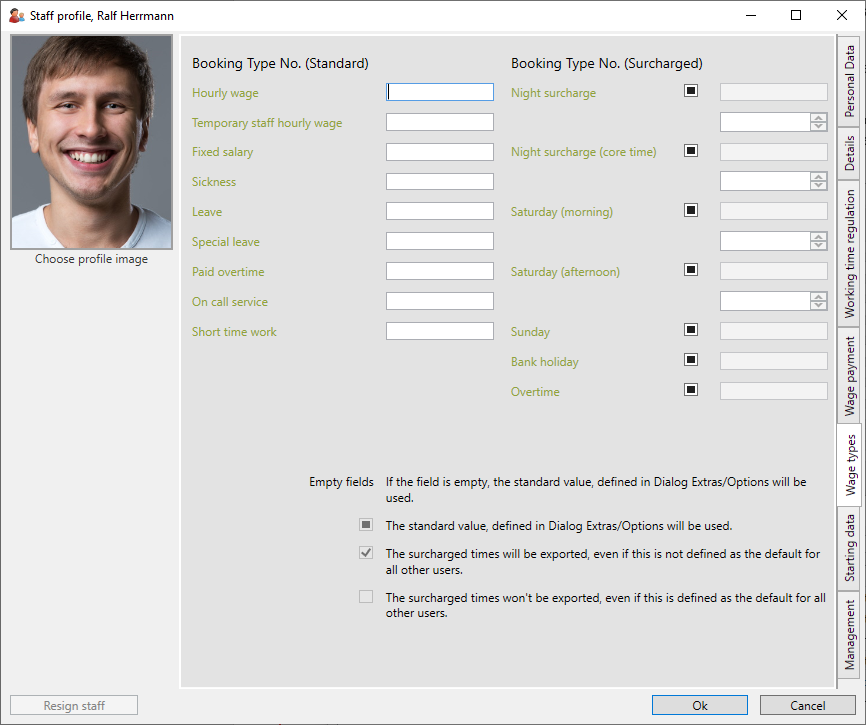
It is important that for empty fields or fields with a filled rectangle, the assignment from the "Tools / Options" dialog is used.
Example 1:
Wage type "1200" is stored for the hourly wage in Extras Options. The wage type "Hourly wage" is not filled for the employee. As a result, the hours are posted to wage type 1200, since the specification has not been overwritten.
Example 2:
A night bonus is set in Extras Options. These hours are posted to payroll account 2000 in the options. For the employee, the check mark for night bonus was explicitly removed. As a result, all employees receive a night bonus, except the employee for whom the check mark for Night bonus has been removed.
Example 3:
In Tools Options, no account is set for Sunday and public holiday. For the employee, however, an account for Sunday and public holiday has been entered. As a result, only the one employee for whom an entry was found for Sunday and public holiday receives the Sunday and public holiday bonus. All other employees do not receive a surcharge because the corresponding field in the Extras / Options dialog was not filled in.
Starting data
At the third page the starting data of the staff member can be defined. The starting data consists of the overtime, the sickness days and the remaining annual leave of the employee.
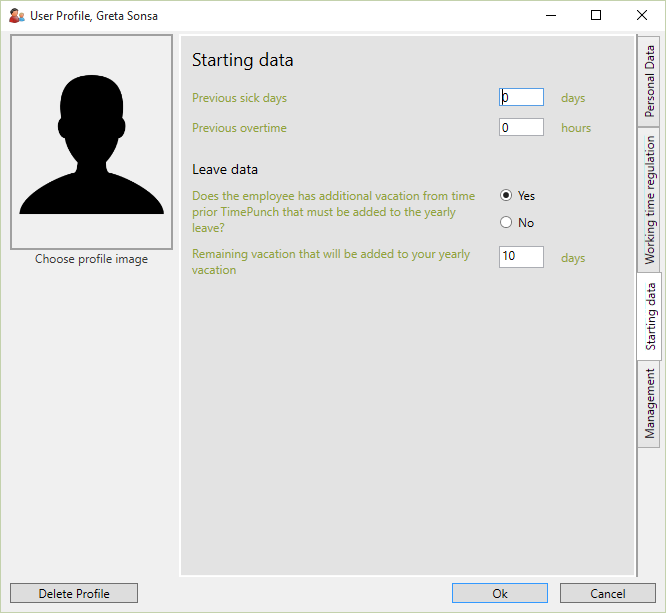
Even if an employee starts during the year, the remaining vacation days need to be entered.
Example: The employee has an annual leave of 30 days but starts in the companies in July. In this case, the 15 vacation days remaining for the first year need to be set as the starting data.
Similarly, if the employee has additional annual leave, this also needs to be entered in TimePunch.
Management
At the last page “management” the authorization of the staff member can be defined, the license can be set, and the logon password can be entered.
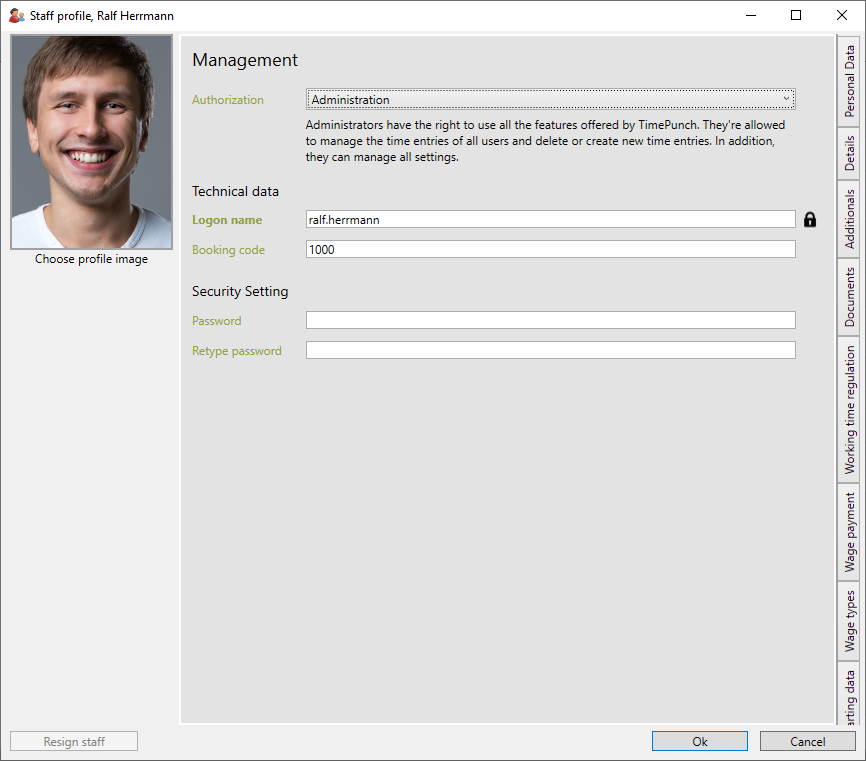
Note: The username can only be changed if the safety lock on the right edge of the input field has been opened before.
Authorization
In TimePunch there are different authorizations. The superior authorization includes the permissions of the minor authorization.
| Permission | Description |
|---|---|
| Administration | Administrators have the right to use all the features offered by TimePunch. They're allowed to manage the time entries of all users and delete or create new time entries. In addition, they can manage all settings. |
| Data Protection Coordinator/Privacy Officer | The Data Protection Coordinator has read-only access to all data within TimePunch. In TimePunch, he is thus treated as an IT administrator, but without the right to change the data that has been viewed. |
| Human resources and project management | This is a combination of the two roles human resources management and project management. |
| Human resources management | Human resources managers may manage time entries of employees that belong to a team, a department, or branch office, which is managed by them. |
| Project management | Project managers are allowed to create and amend projects. They can access the project times by the project reports. |
| Staff member in position of trust | Staff member in position of trust can create own time entries and modify existing time entries. |
| Staff member | Staff member can only record time entries, but no longer subsequently change it. If they are a team leader, head of department or branch manager, then they can see the recorded times of their employees by using the reporting feature. |
| Fired | Fired employees no longer have their own access in TimePunch. However, unlike employees in the "No access" group, the times of fired employees can still be evaluated by the personnel management. The group membership is also retained and the employees can be rehired at a later date. |
| No Access | Staff member in this group are archived and can be reactivated for a subsequent evaluation of the times. |
Security Setting
The staff member can set their own password at this page. Alternatively, the password can also be set by a member of the administration group.
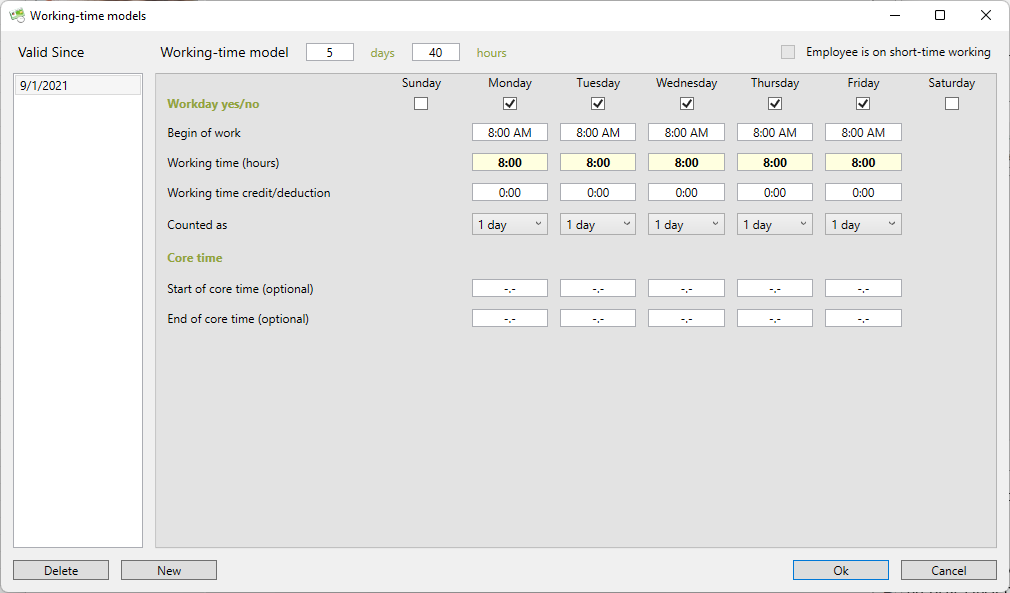
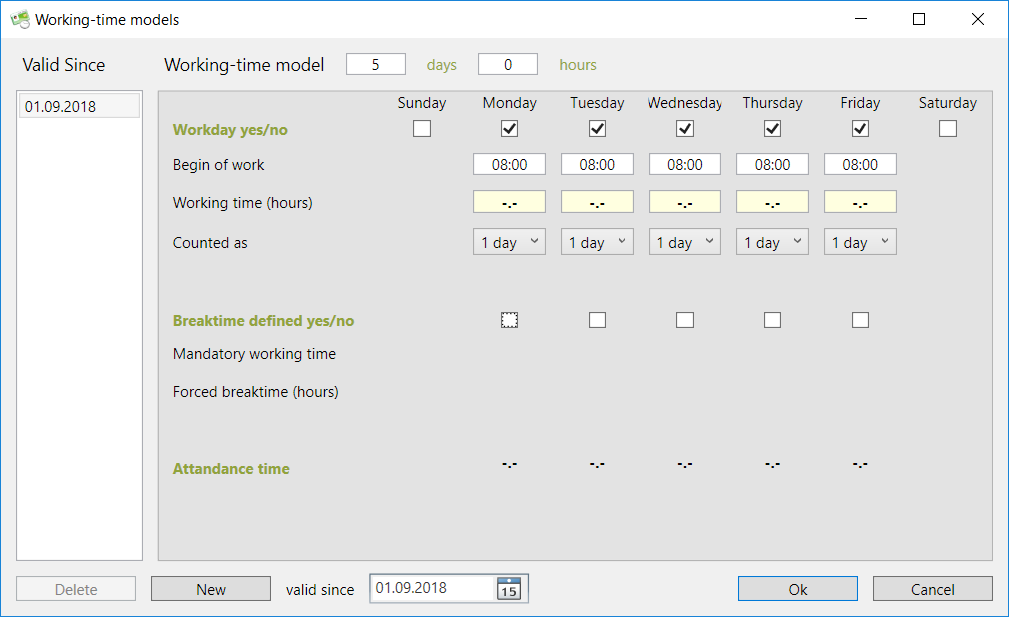
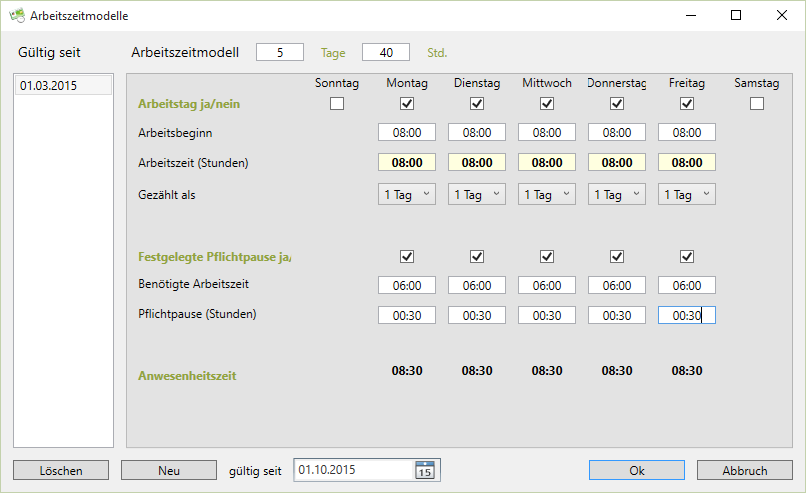
The working time model in detail
TimePunch can handle a distinct working time model for each day in the week. The structure of the daily model is always identical for each day - as you will see.

The checkbox workday (yes/no) defines, if the employee has to work at this day.
If the employee is working a day, the regular starting of work is needed next. The regular start of the work is independent of the concrete booking time and it’s used only for planning and better overview.
The third line "Working time (hours)" specifies how many hours the employee need to work on that day. The planned time of the employee in the month is calculated with this claim.
As the last mandatory field, one must specify whether the workday as a full day or half day is counted. This is important for the management of the holiday. If part of the working day (counted as) is half a day, then only half will be deducted holiday in case of a leave.
**
**
Special feature TimePunch TEN
In TimePunch TEN it can be defined in the working time model whether and from when a minimum break is automatically deducted. The minimum break determines which break time is booked at least from the set working time. If the employee books a shorter break time or none at all, the manually booked break time is filled up to the minimum break time.
Changing the mode of employment full time to part time
If employees want to change from full-time to part-time work, or after maternity leave, rise again as a part-time force, then this must be represented in the working time model.
To do this, a new working time model need to be created where the date must be applied when the employee changes employment.
To do this, select the "New" button. The following dialog appears:
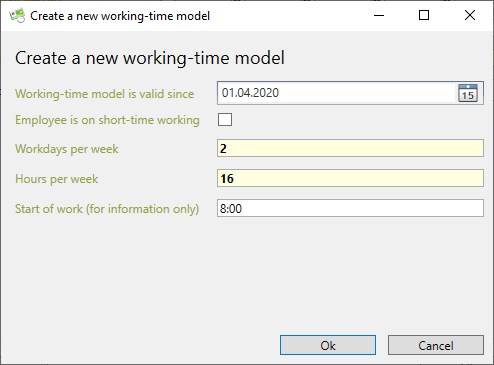 Here you can already define certain specifications, such as the start of the working time model, number of weekdays and hours per week. It is also possible to define the working time model as reduced working hours. TimePunch then automatically calculates the KuG hours.
After confirming the dialog, it will be created and can be adjusted again in the overview of the working time models to the respective needs. Saving the model is done by clicking the "Ok" button.
Accidentally created working time models can be removed again using the "Delete" button.
Short-time work in TimePunch
TimePunch supports the automatic calculation of KuG hours. The ratio of paid planned hours to KuG hours is required by the tax consultant or payroll office to calculate reduced hours compensation.
For this to work, a new reduced hours working time model must be created in TimePunch for the relevant employees. This model contains the reduced number of planned hours. The subsequent, regular hour model is used as the basis for the calculation.
Two working time models are therefore always required to calculate the reduced hours. One with the regular hours and one reduced working time model.
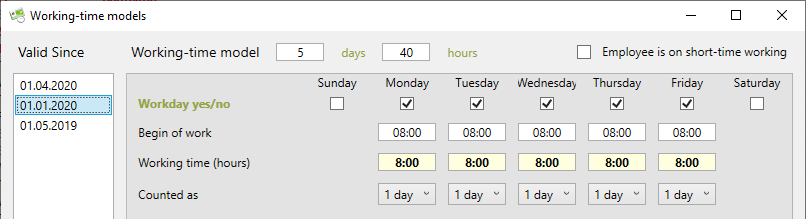
Example, regular working time model:
Example 2, shortened working time model:
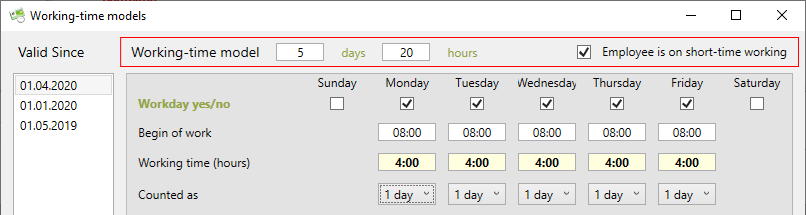
In this example, the employee works 50% short-time from 01.04.2020. He thus changes from a 40-hour model to a 20-hour working time model.
An evaluation of the KuG hours is carried out via the reports "Short-time work, daily report" and "Short-time work, tabular". The KuG hours are also transferred to the corresponding payroll accounting systems via the wage data export.
The calculation of the KuG hours can be defined more precisely in the dialog "Extras / Options" in the register Internals.
Flextime and overtime during short-time working
As a rule, no overtime may be accumulated during short-time working. It is therefore important to adjust the working time model during short-time work so that no overtime is accumulated.
If this cannot be foreseen by the operational procedure, it is recommended to enter the minimum number of working hours. In individual cases, this can also be 0 target hours if it is not clear in advance how many hours are actually worked.
To prevent overtime from occurring, the monthly overtime must be limited in the flextime account.
Example: Preventing overtime
If the month has already started, this setting can also be implemented in the analysis in the "Overtime / Extended" tab.

TimePunch then calculates the KuG hours based on the real working time. These can be exported to the appropriate payroll accounting systems or output via the reports.
Import and export staff member profiles
Within the master data the staff member profiles can be imported and exported by using the menu called “File”.
This happens mainly by importing and exporting CSV files. For the import it will be supposed that the first row contains the column title. The title defines the content of the column. The column order and completeness is not important as long the mandatory field “Logon name” is filled.
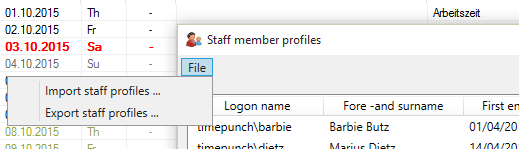
Hint: The easiest way to create an import template is to export a set of test data using "file / Export staff profiles" and save as CSV file.