Employees
Overview
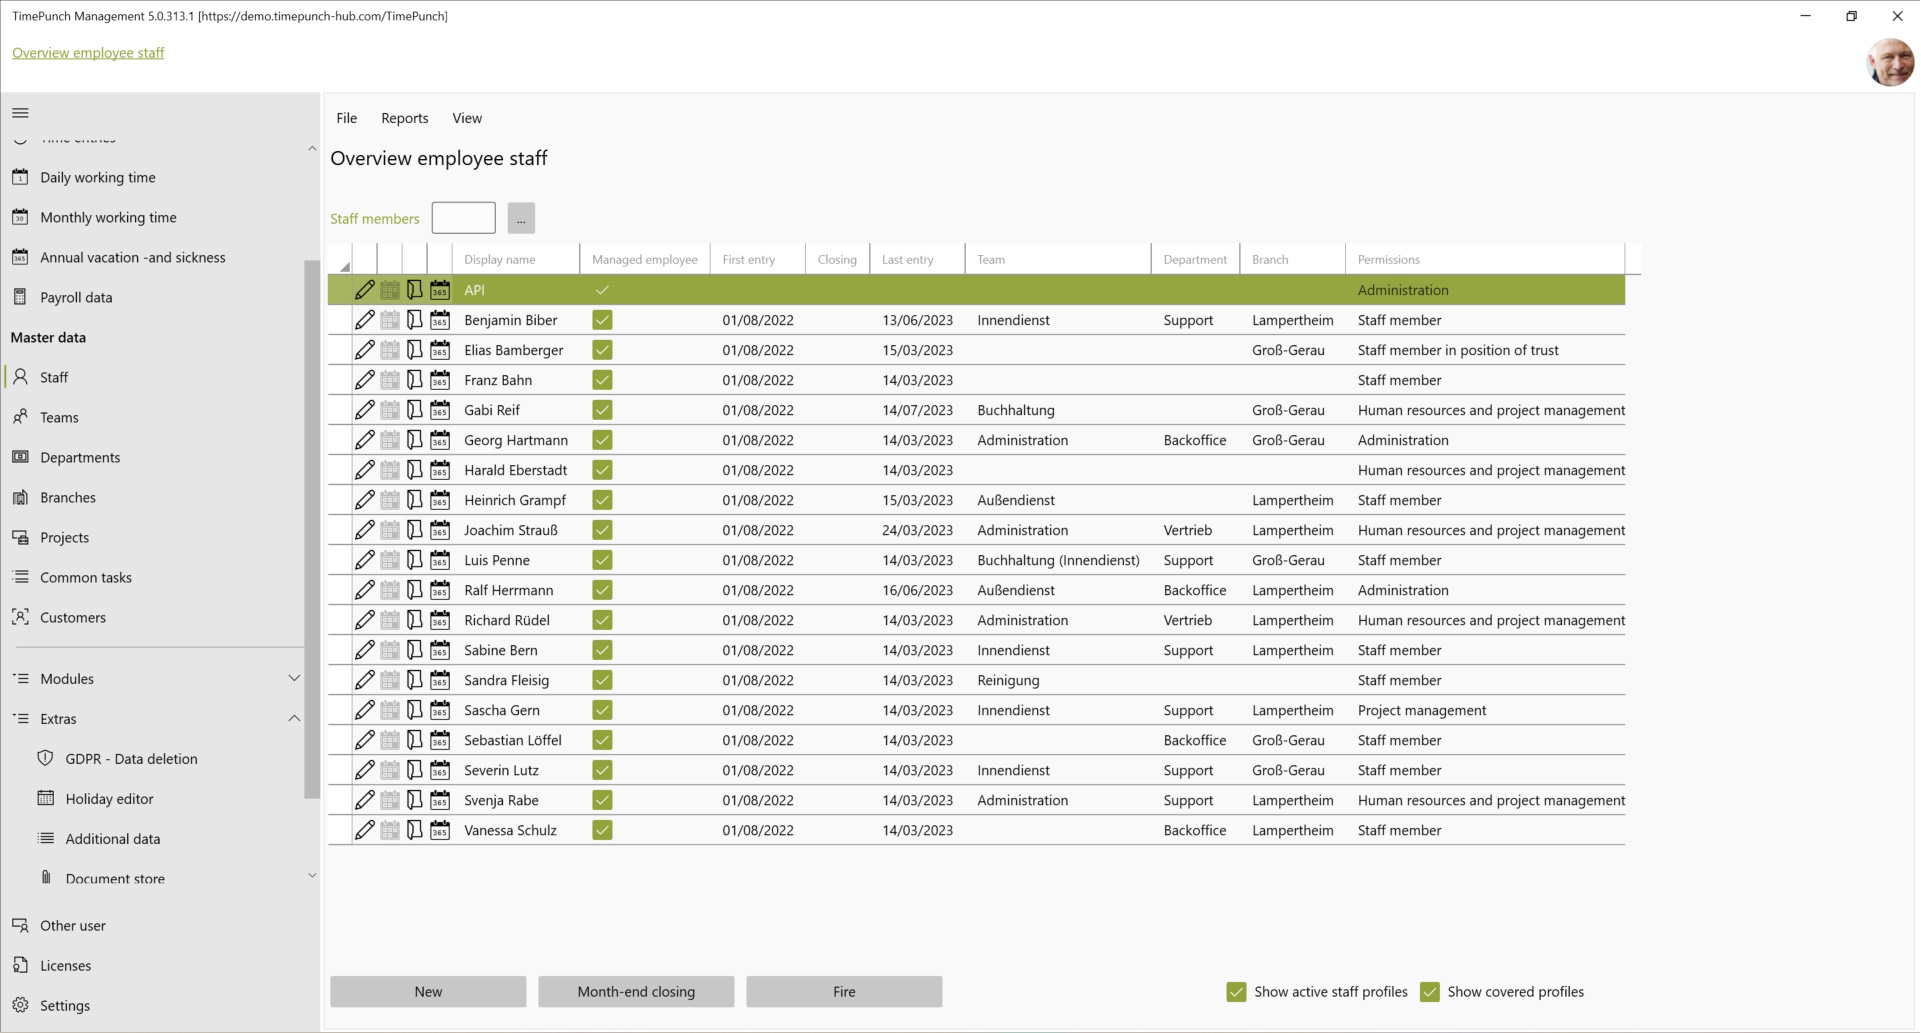
A click on "Employees" in the navigation bar opens the page "Overview of employees". There all employees of the of the company, with the most important master data.
Important
The column "Managed" shows whether the employee profile is managed by the current user. However, managed in this case does not necessarily mean that full editing of the profile is allowed. It rather says that the employee profile is assigned to a group/organizational unit (e.g. team/department/branch) for which the current user is registered as group leader or assistant. The actual rights are derived from the role of the currently logged in user.
Switch, Show active employees: If this switch is set, then only the active employee profiles are displayed. Already terminated employees are hidden.
Switch, Show managed employees: If this switch is set, then only the managed employee profiles are displayed. This makes it easier to find employees who can be edited.
The inline navigation is used for further navigation in the employee area.
The following actions can be performed using the buttons at the bottom.
Create employee : Via the button "New" on the page "Employees" a new employee can be created.
Initialise/onboard: The "Initialise/onboard" button is used to assign a licence to new employees and set a password. The employees then receive an info e-mail with the access data.
Monthly closing : Via the button "Monthly closing" on the page "Employees" a monthly closing can be carried out for one or more employees.
New time model : Via the button "New time model" on the page "Employees" a new working time model can be created for one or more employees.
Fire : The "Fire" button on the "Employees" page takes you to a dialog for terminating an employee.
Create new employee
Clicking the "New" button on the "Employees" page opens a dialog for creating a new employee.
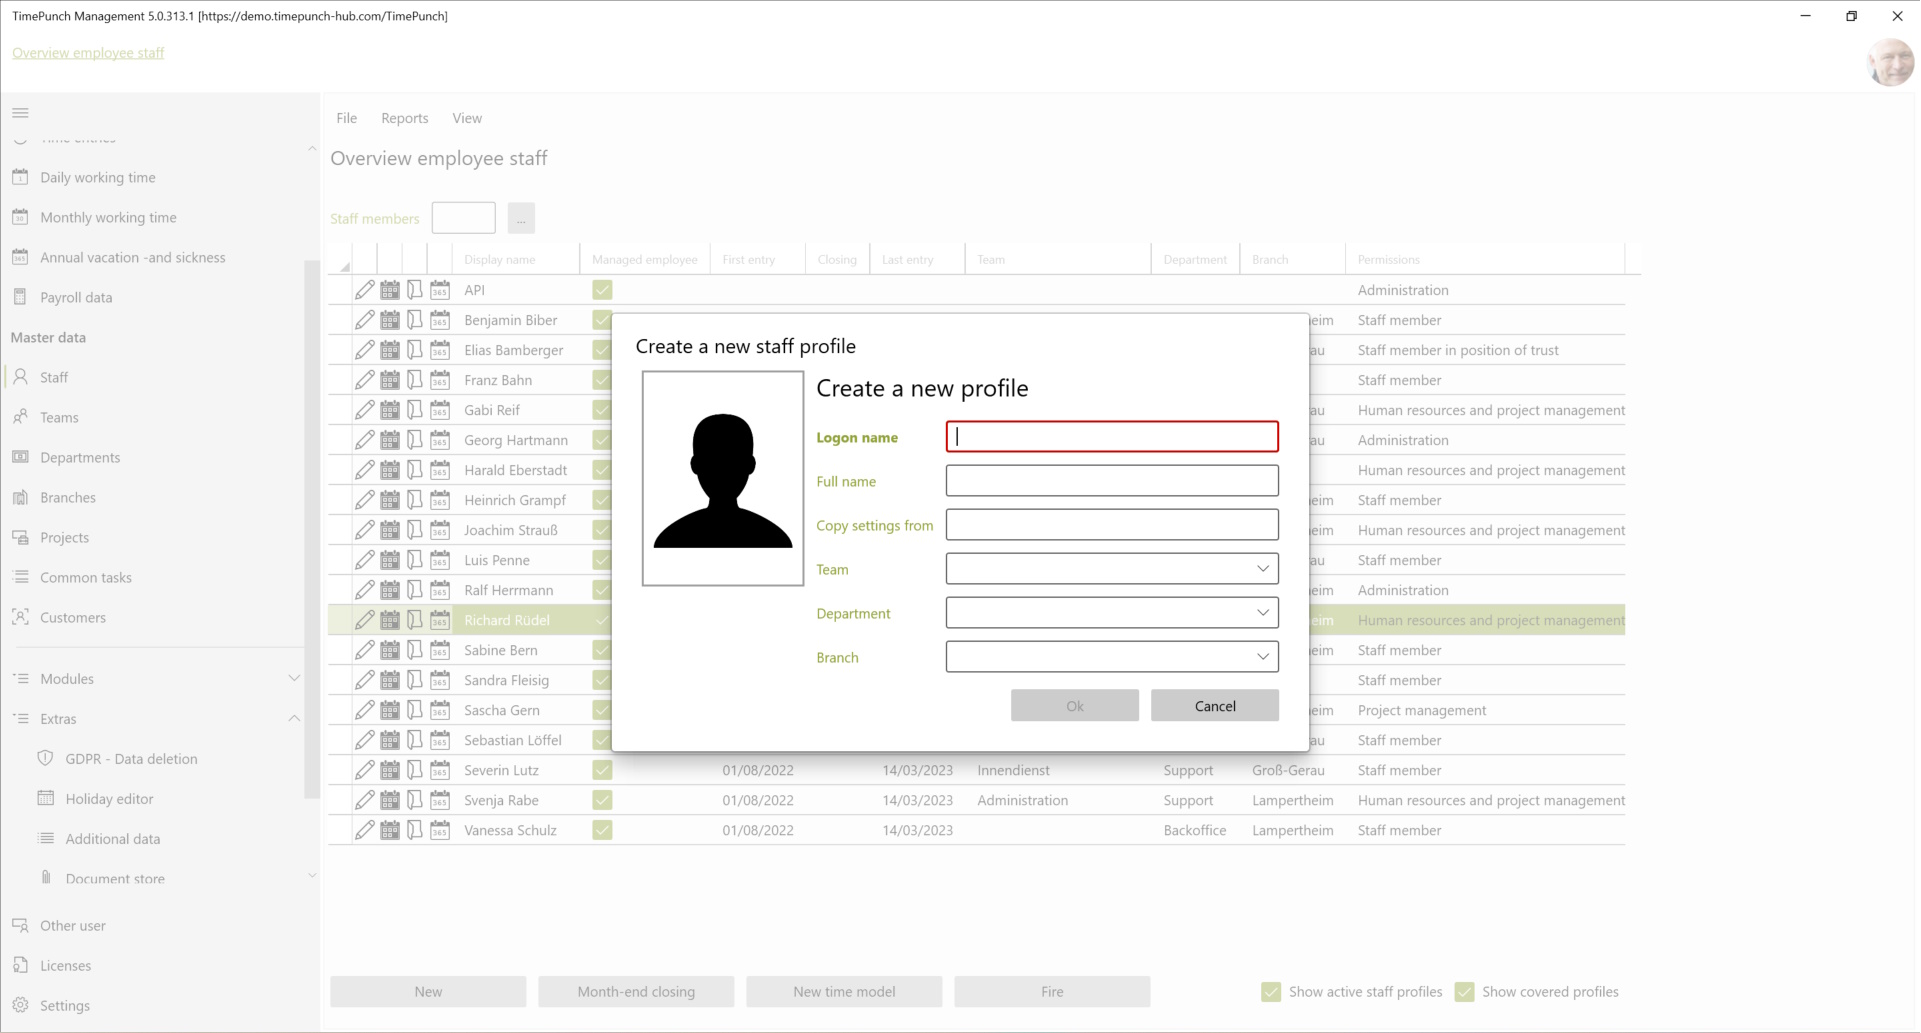
In the "Create New Employee Profile" dialog, the username is a unique name to identify the employee*. In on-premises systems, the username should match the employee's login name in the company's Active Directory. In cloud-based TimePunch, this is not required. There, uniqueness is sufficient. In the Full Name field, the employee's name can be entered in the scheme "First Name Last Name" or also "Last Name, First Name".
If there are already employees using the same working time models, the settings of these employees can be copied when creating a new employee. For this purpose, the field "Copy settings from" must be filled in.
If the new employee belongs to a certain team, department or branch, the group affiliation (team, department, branch) can also be set when creating the new employee.
Important: If new employees are created by employees with the role "Personnel management", then the group affiliation to the team, the department and/or the branch should be set correctly. Otherwise, it may happen that the newly created employee is not in his/her own authorization and therefore cannot be processed further.
Initialise/onboard
Clicking on the "Initialise/onboard" button on the "Employees" page opens a dialogue for setting the employee's licence and start date. All employees previously selected in the overview are displayed in the dialogue.
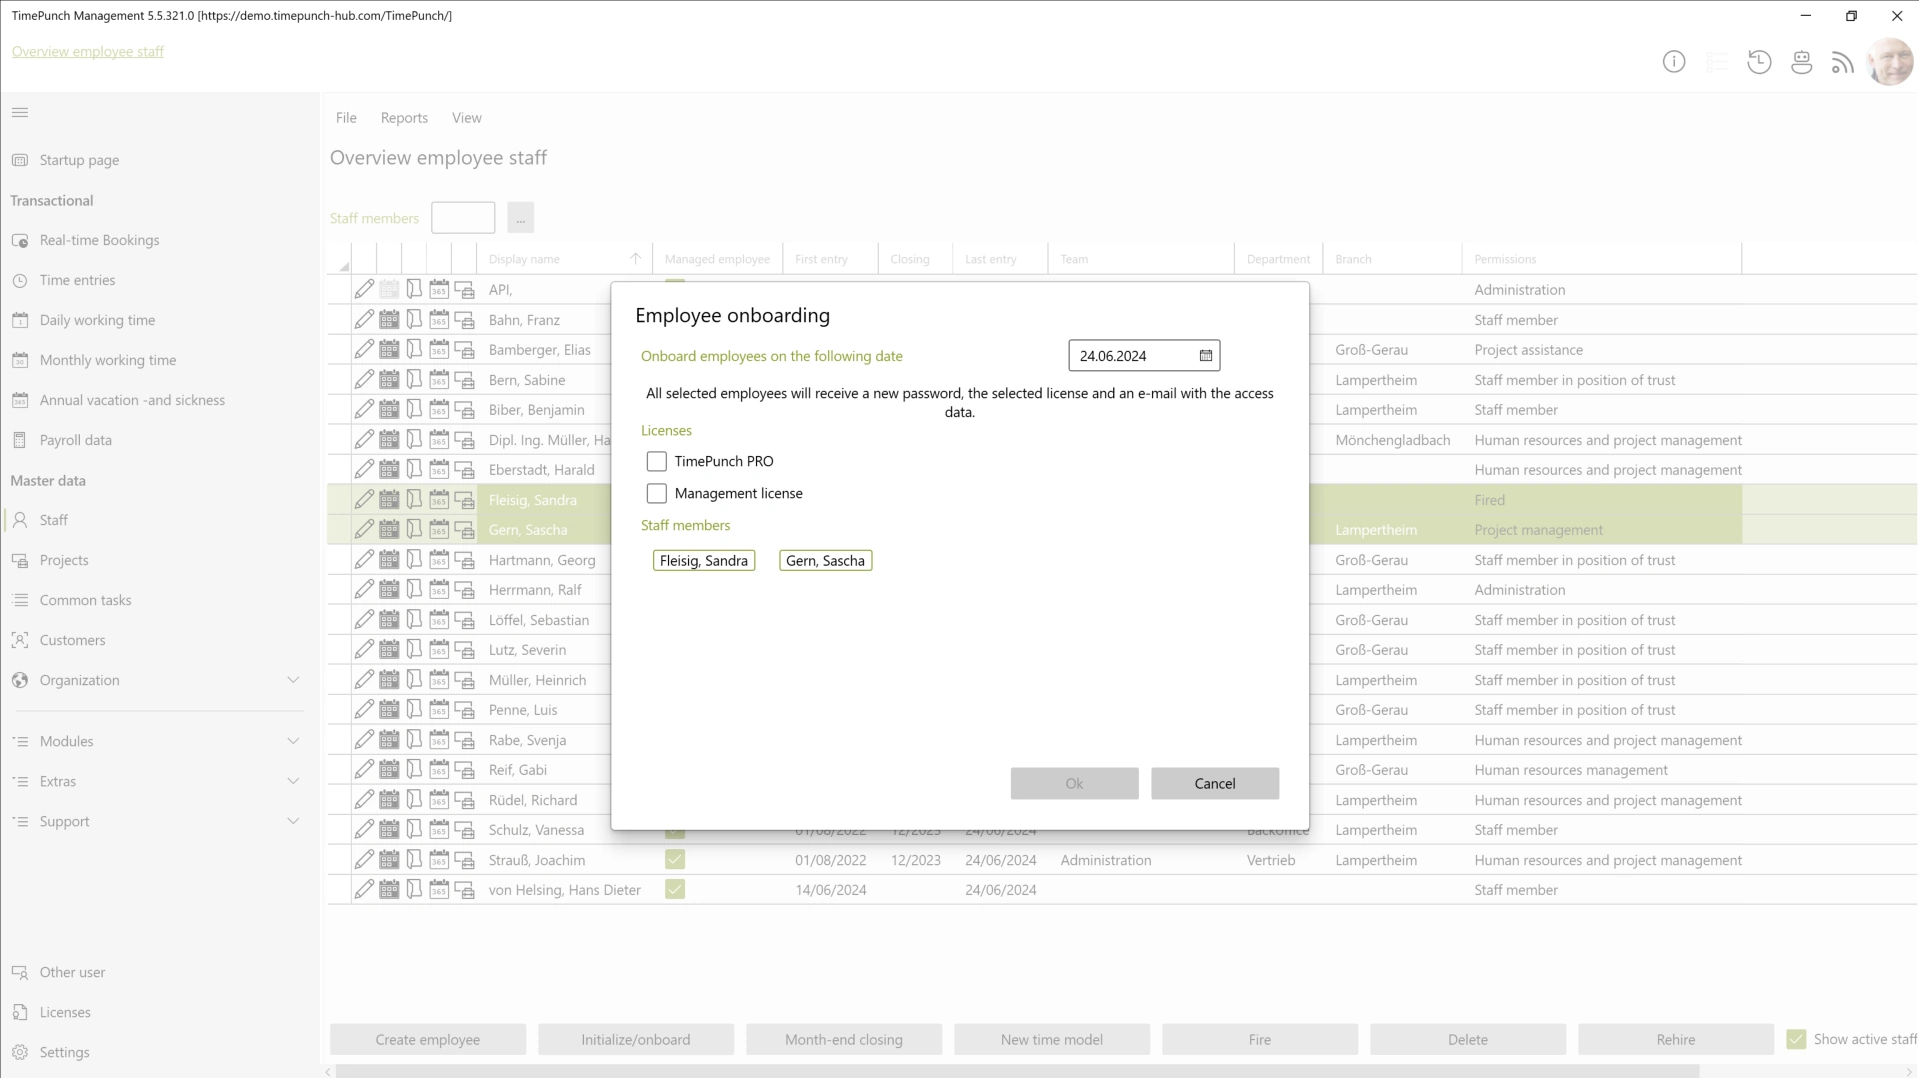
New licences can be assigned to employees in this dialogue. If no licence is selected, the employees retain their existing licences.
The start date of new employees in the company can also be specified.
TimePunch creates a dummy entry for this date so that the new employees appear in the monthly overview. If they start in the middle of the month, the days up to the first working day are marked as non-working days. In this way, new employees do not start with a negative working time account due to the days missed at the beginning.
Perform month-end closing
Clicking on the "Month-end closing" button on the "Employees" page opens a dialogue for carrying out a month-end closing for one or more employees. The month-end closing is always carried out for the previously selected employees.

Once the month-end closing has been carried out, all times up to this point are fixed and can no longer be changed retrospectively. This ensures that the status of the working time account can no longer change up to this date. The same applies to the holiday balance and the flexitime account.
Undo month-end closing
The recommended way to undo a month closure is to set the month closure to a month before the month to be opened. For example, if February is to be edited, then the month closure must be set to January. February will then be available for editing again. It is not necessary to unlock all months via the "Unlock all" button in the "Month end" dialog. The option "Unlock all" should be chosen with care.
Create new working time model
Clicking on the "New time model" button on the "Employees" page opens a dialog for creating a new working time model for one or more employees.
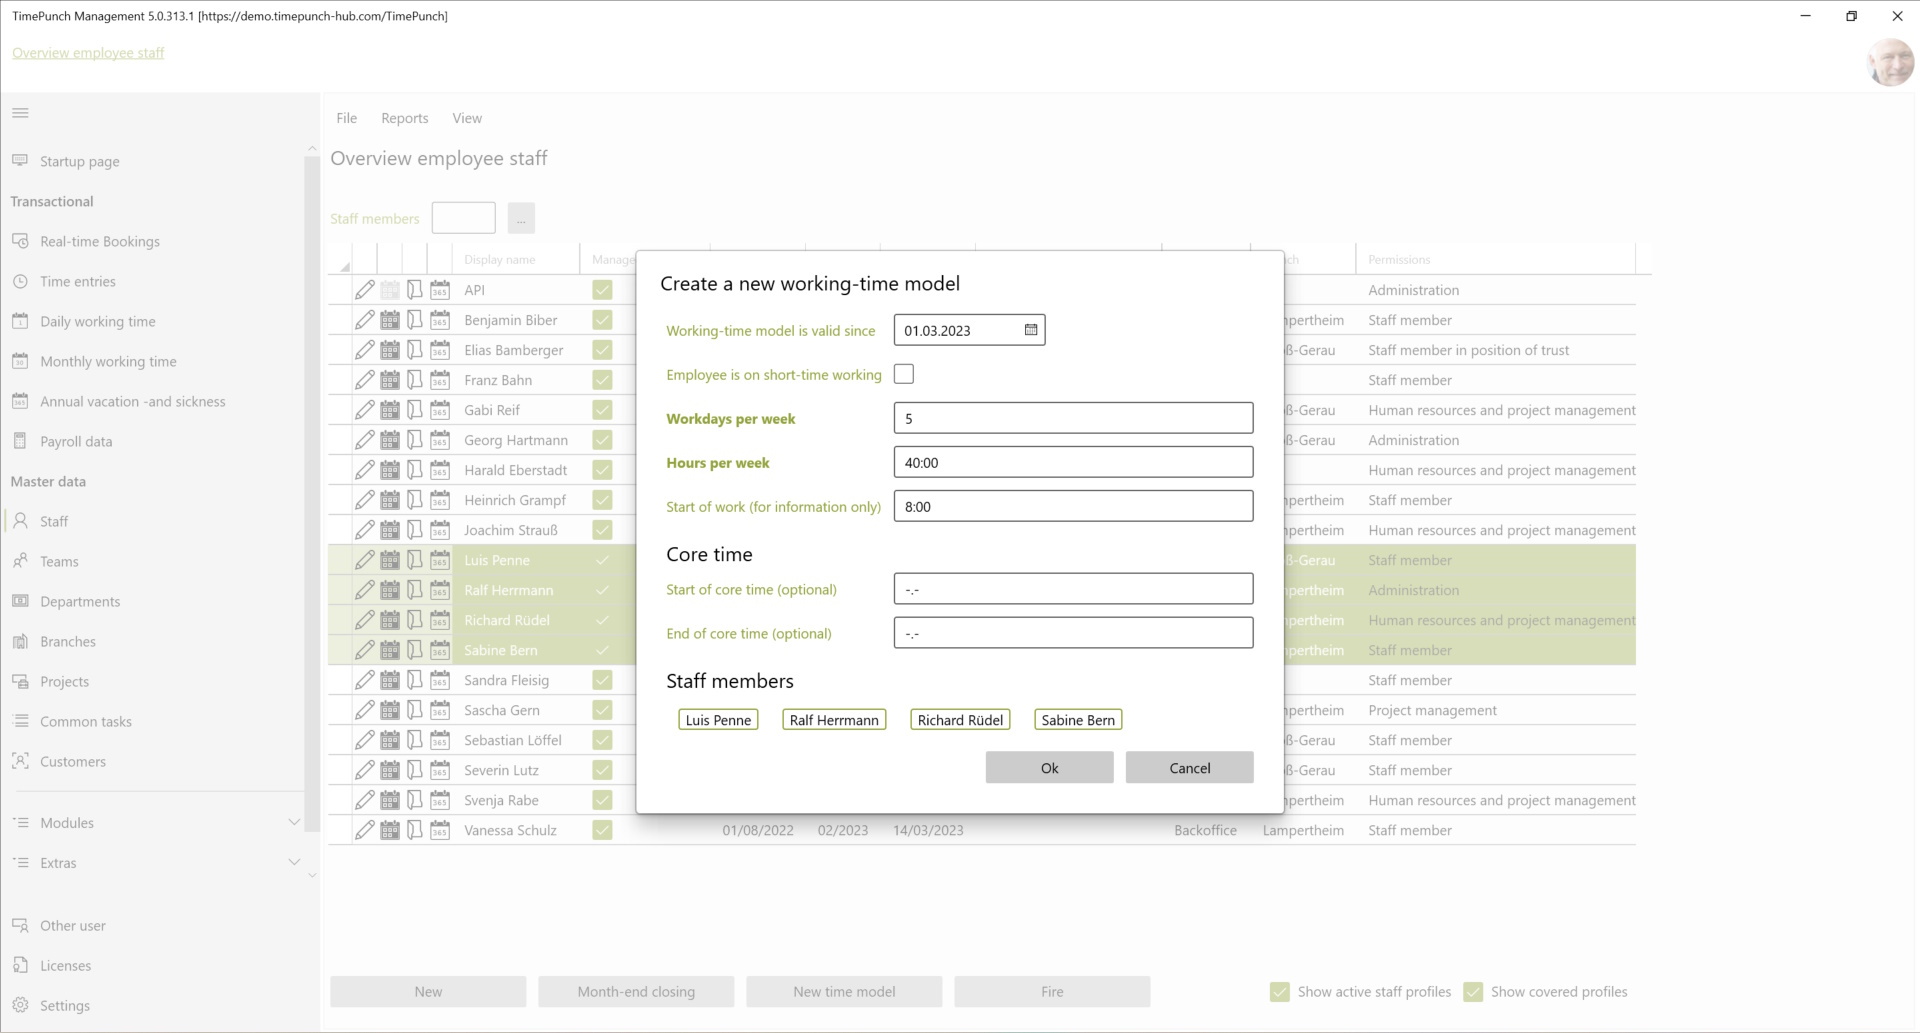
An important information in the dialog "Create a new work time model" is from when the work time model should be valid. The daily working time is calculated based on the selected working days and weekly hours.
Important : If the checkbox "Employees are on short-time work" is selected, the default for the weekly working time will be "dynamic". This means that employees do not have a fixed weekly working time, but can come in as needed. What is missing in working time within the short-time work is filled up with the calculated short-time work. This means that employees do not suffer any losses in their flexitime account. However, no overtime may be accumulated during short-time work. Therefore, the flexitime account does not change during short-time work.
Set core time
Entering core working time is optional. If a core working time is stored in the working time model, then the employees concerned, as well as their superiors, can be informed in the event of core working time violations. The corresponding settings can be found in the program settings under the item "Core time violations".

Manage projects for employees
Clicking on the "Project assignment" icon opens a new page on which projects can be assigned to a selected employee.
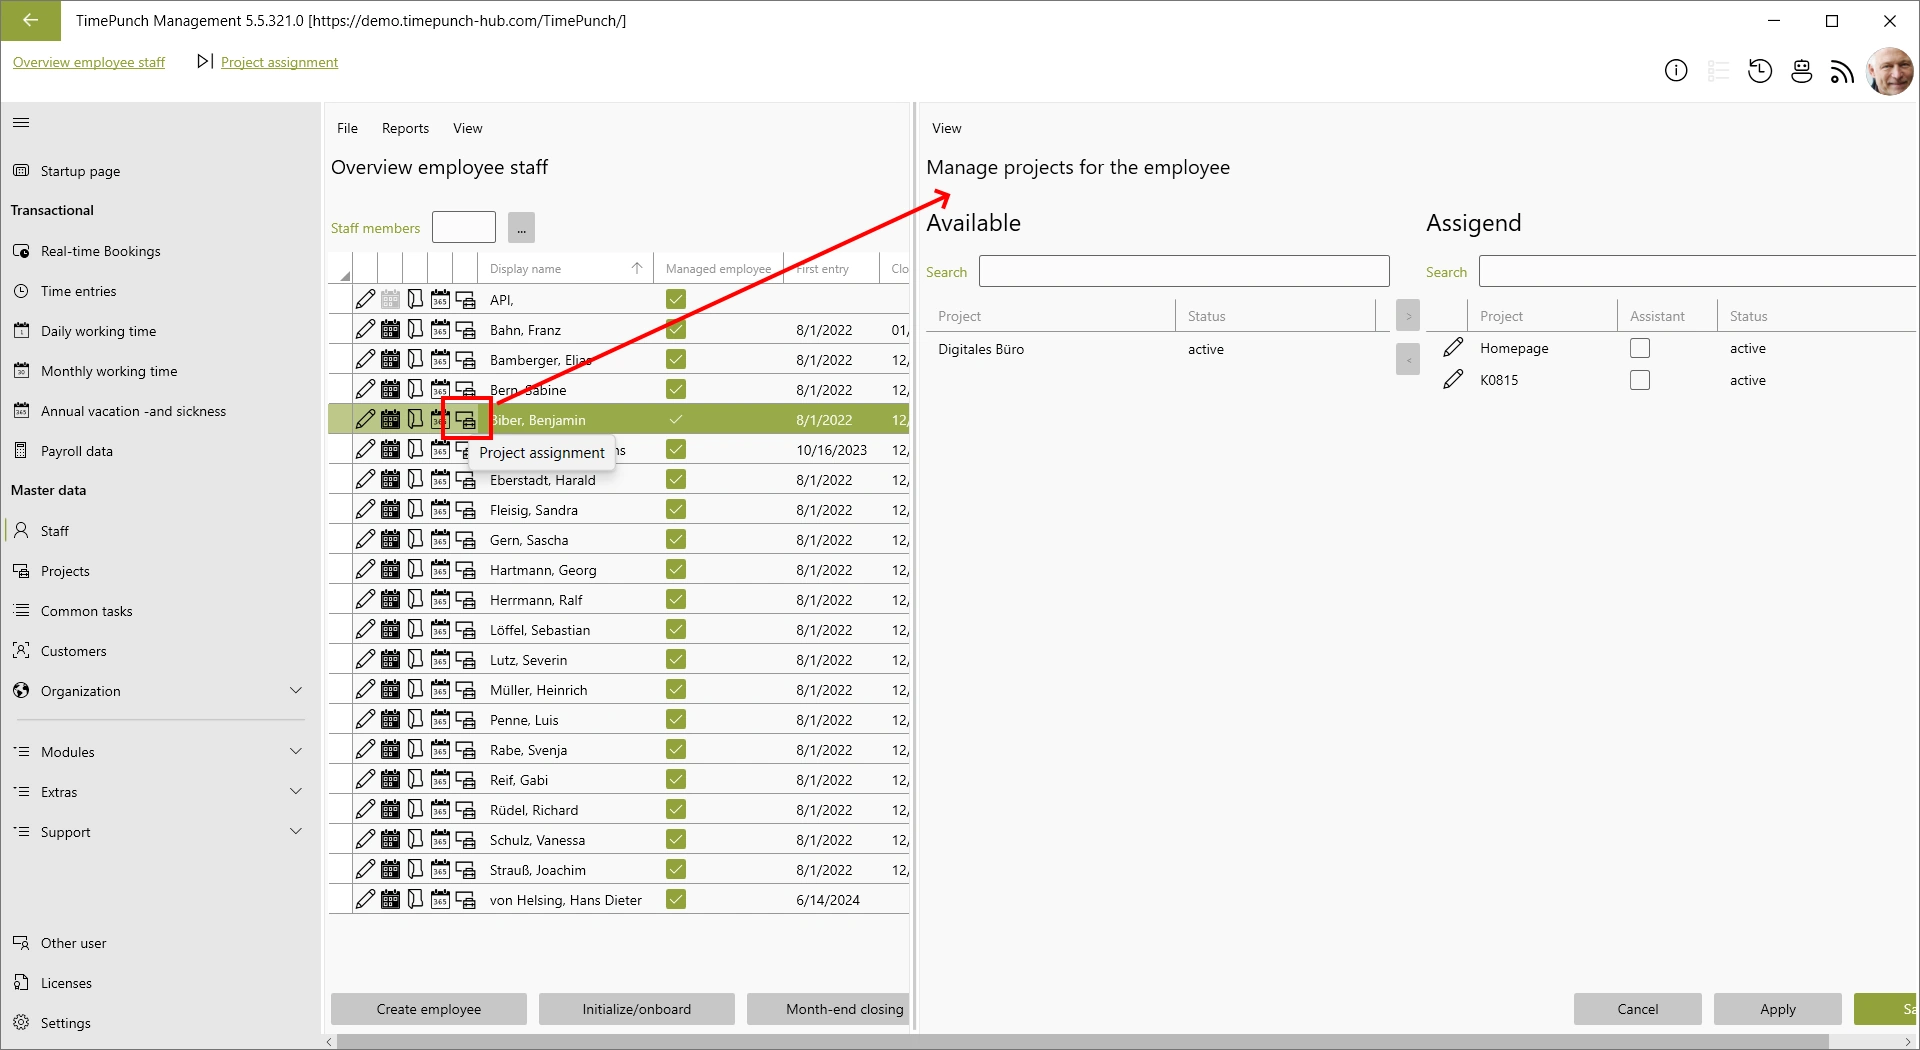
If the logged-in user is a project manager, they can assign projects for which they are either the project manager or the assistant to the selected employee. This is done by double-clicking on the project name in the left-hand column with the heading "Available".
To withdraw an employee's authorisation for a project, you also need to double-click on the project in the right-hand column with the heading "Assigned".
Important : Only projects for which the access rights are set to "Project can only be booked by selected employees" are displayed on this page. Projects that can be booked by all employees are not displayed, as they are available to all employees anyway. Projects that can only be booked by administrators are also not displayed.
Terminate employees
Clicking the "Terminate Employees" button on the "Employees" page opens a dialog for terminating one or more employees.
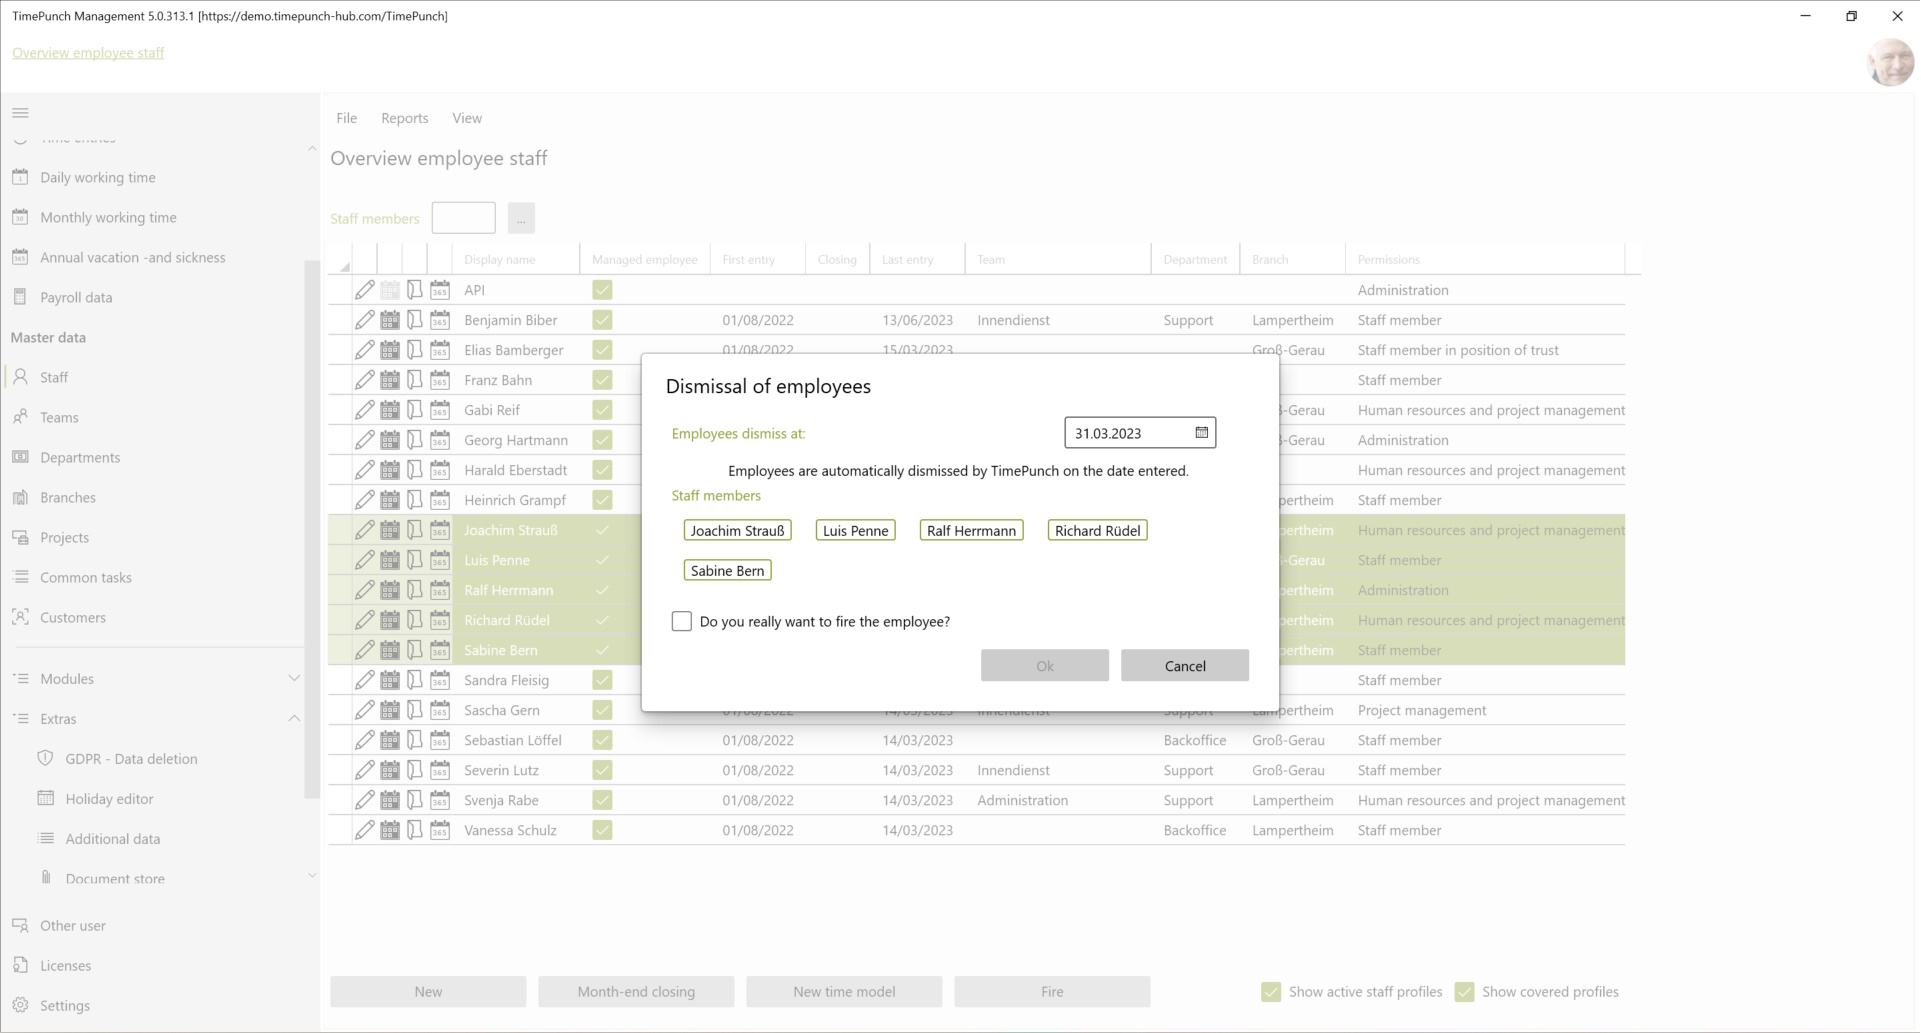
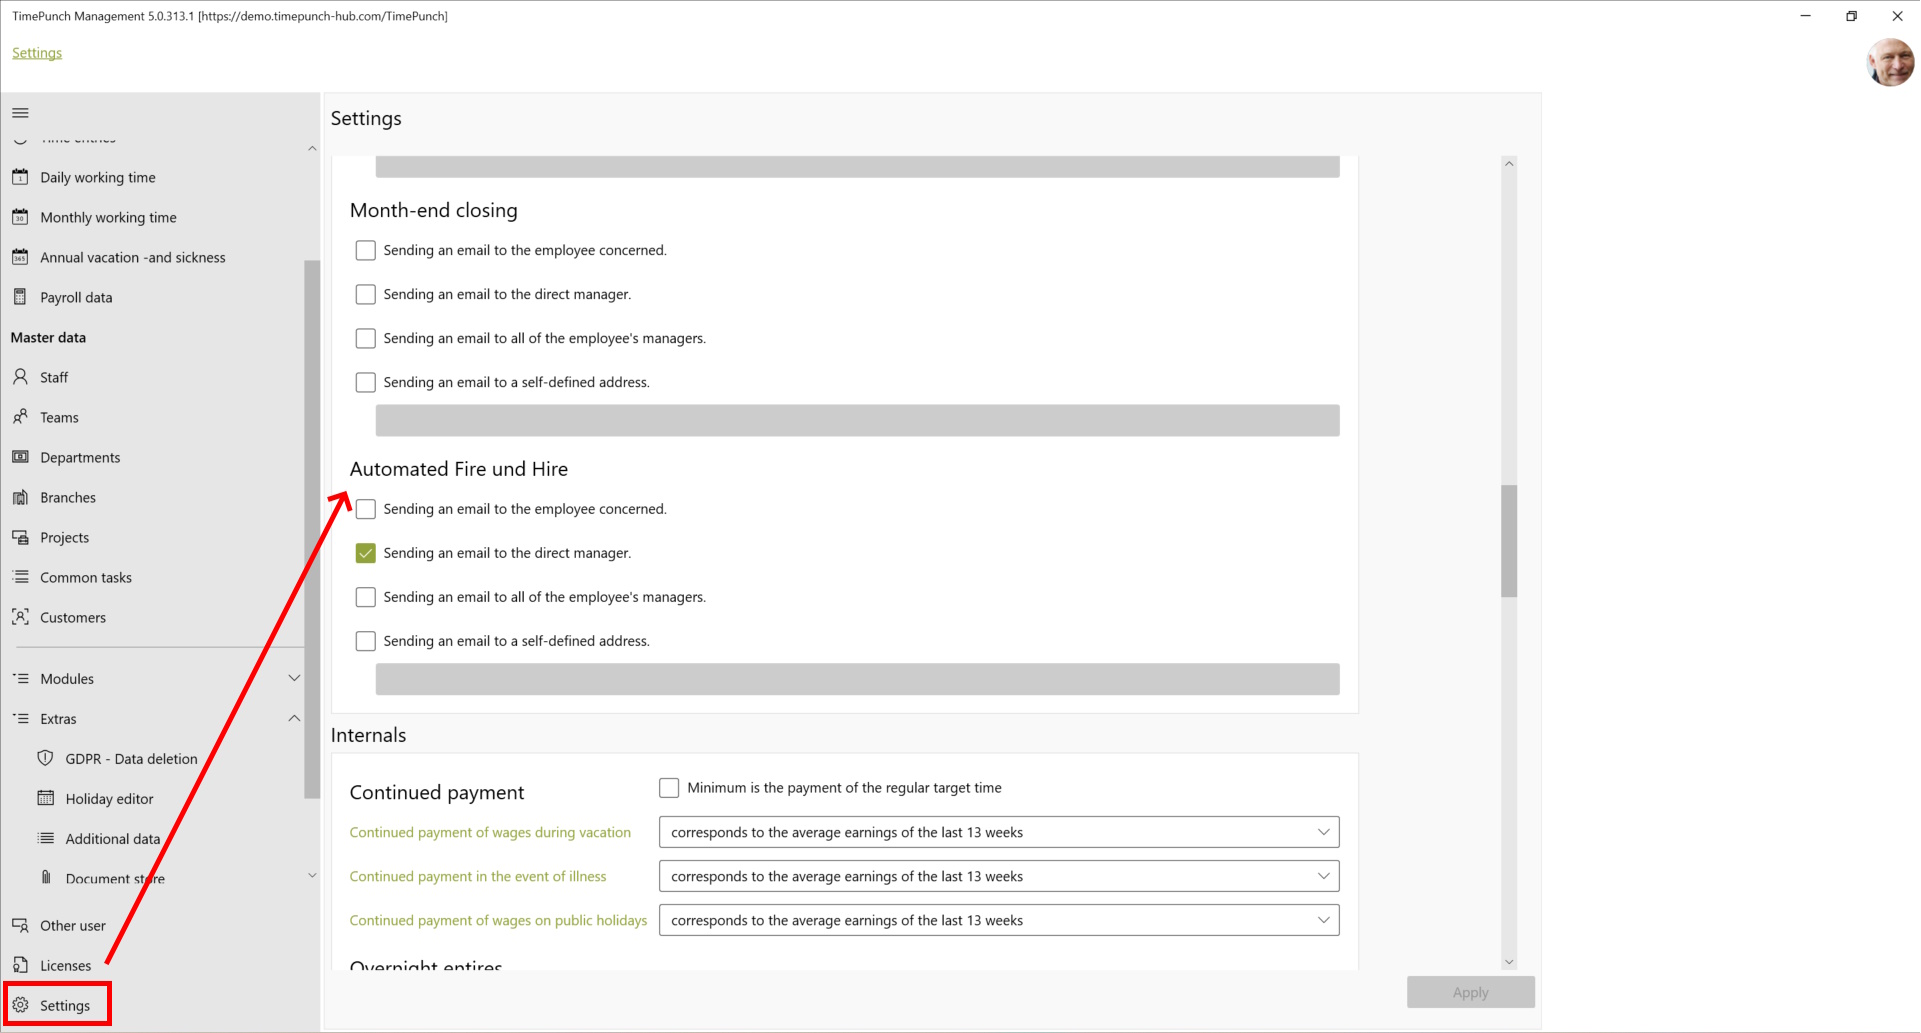
Important : If the termination date is in the future, then the employees will not be terminated immediately, but only on the entered date. This can be checked in the employee's profile. If the termination date is planned, the termination date is in the future. On the day of termination, automated emails can be sent to the affected persons and managers. The settings for this, can be found in the program settings under the item "Automated terminations and re-settings".
Edit employee
By double-clicking (with return on the keyboard) on the line of an employee on the "Employees" page, the profile of the selected employee will be opened.
Depending on their own role, less or more data can be edited.
Personal data
In the first tab "Personal data" on the page "Edit employee" the personal data of the employee are defined.
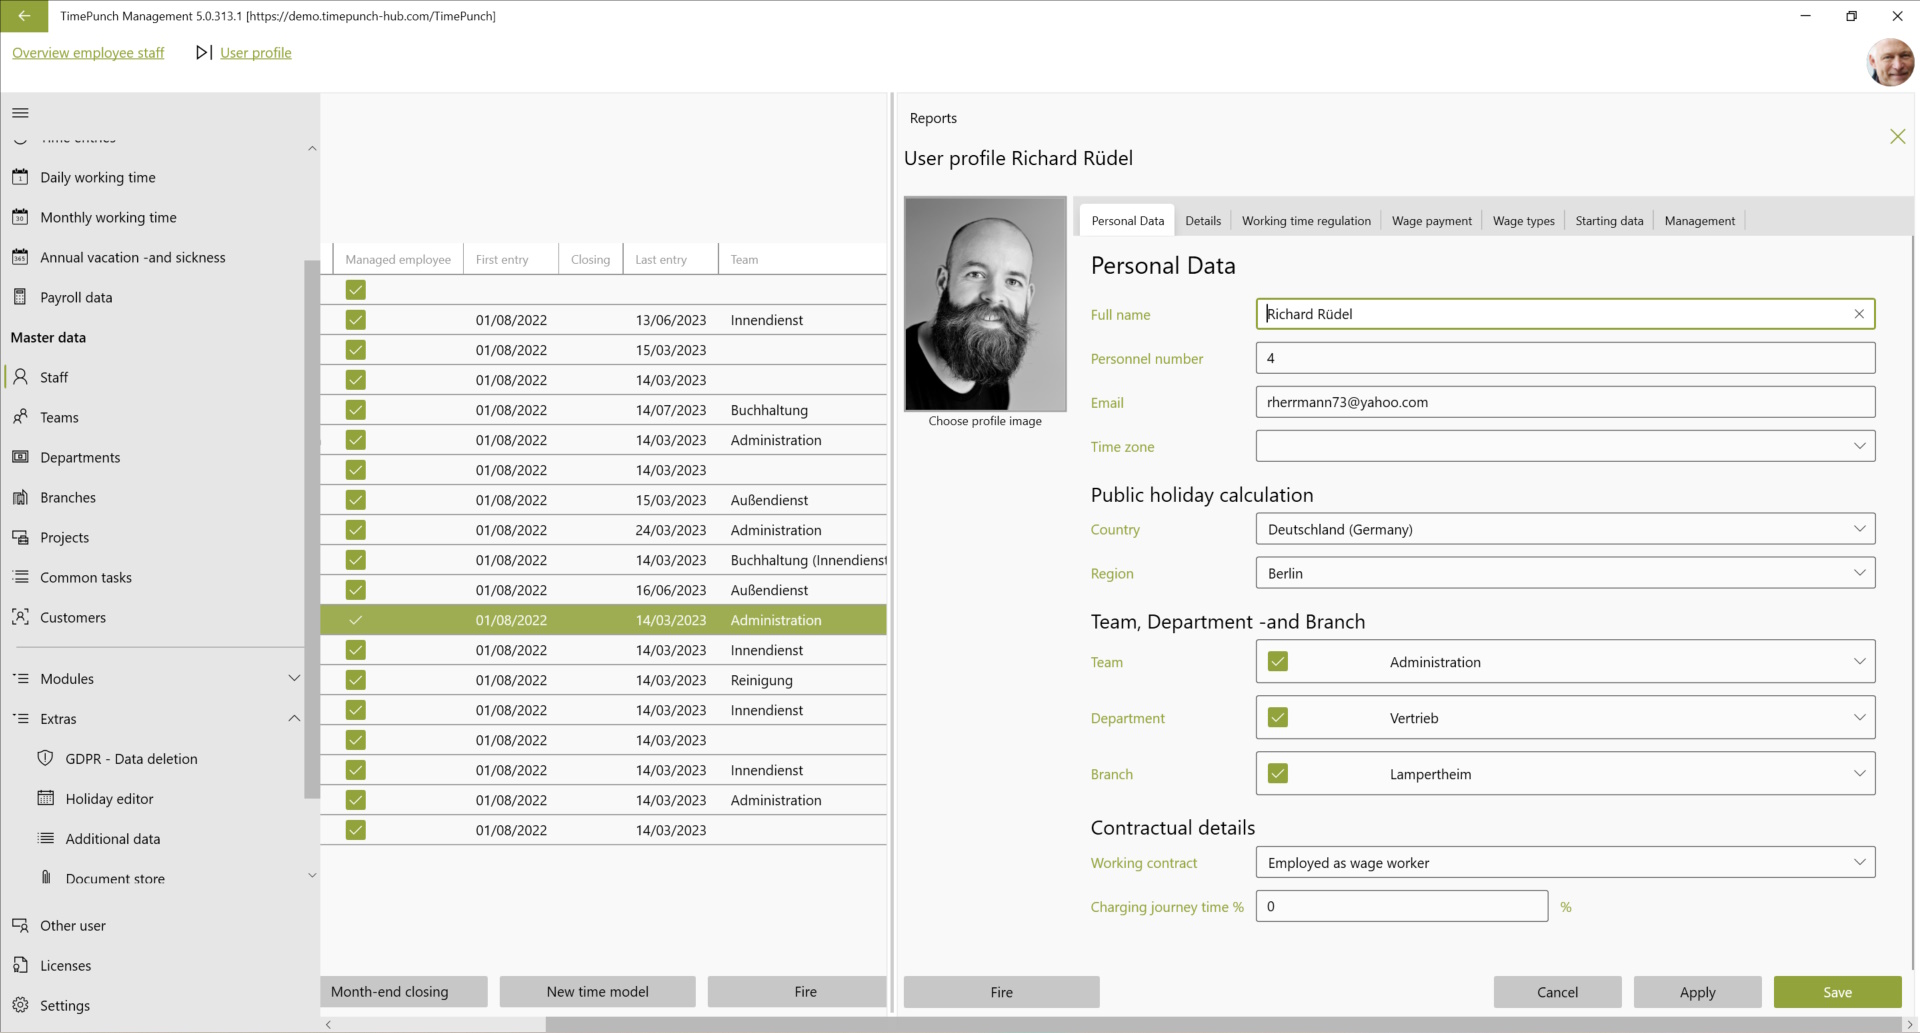
The personal data includes the personal data (personnel number, first name, last name and e-mail address). In addition, the country and state can be defined as the basis for the holiday calculation.
The team, department and branch membership defines the membership of the employee in the different groups.
Note : The group/organizational unit (team, department, branch) displayed directly to the employee is the respective main group. The main group decides which managers release the absence requests. Only group leaders/assistants in the respective assigned main groups are asked for absence requests. All other group leaders are only informed about the absence.
Finally, the contractual details must be defined. Here you can choose between "Salaried with fixed salary", "Salaried with hourly wage", "Employed with hourly wage (regular holiday work)" and a pure time recording without flexitime calculation.
The "Select profile picture" button is used to specify any JPG or PNG file as the profile picture. This image appears when logging in and is used to visually distinguish employees.
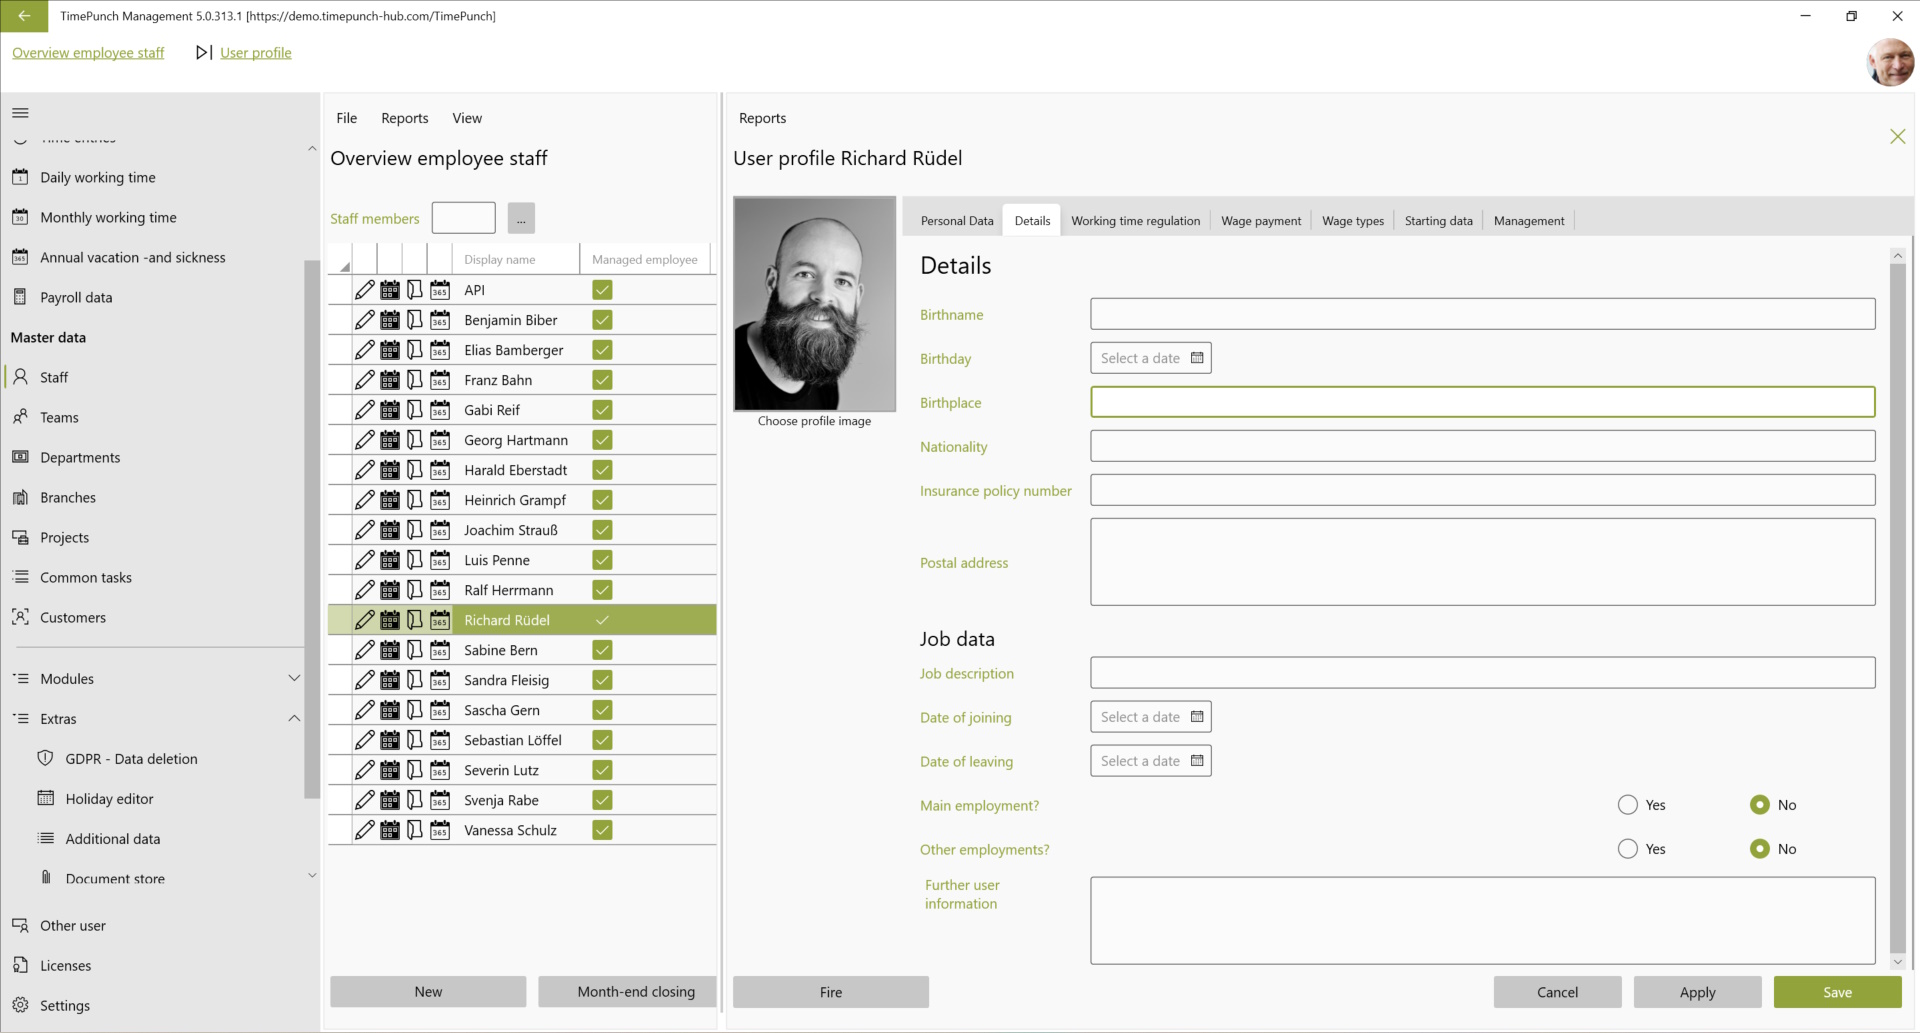
Sensitive detail data
In the second tab "Details" on the page "Edit employee", sensitive data is displayed and edited. This data is only displayed to employees with the role "Personnel Management" and/or "Administration".
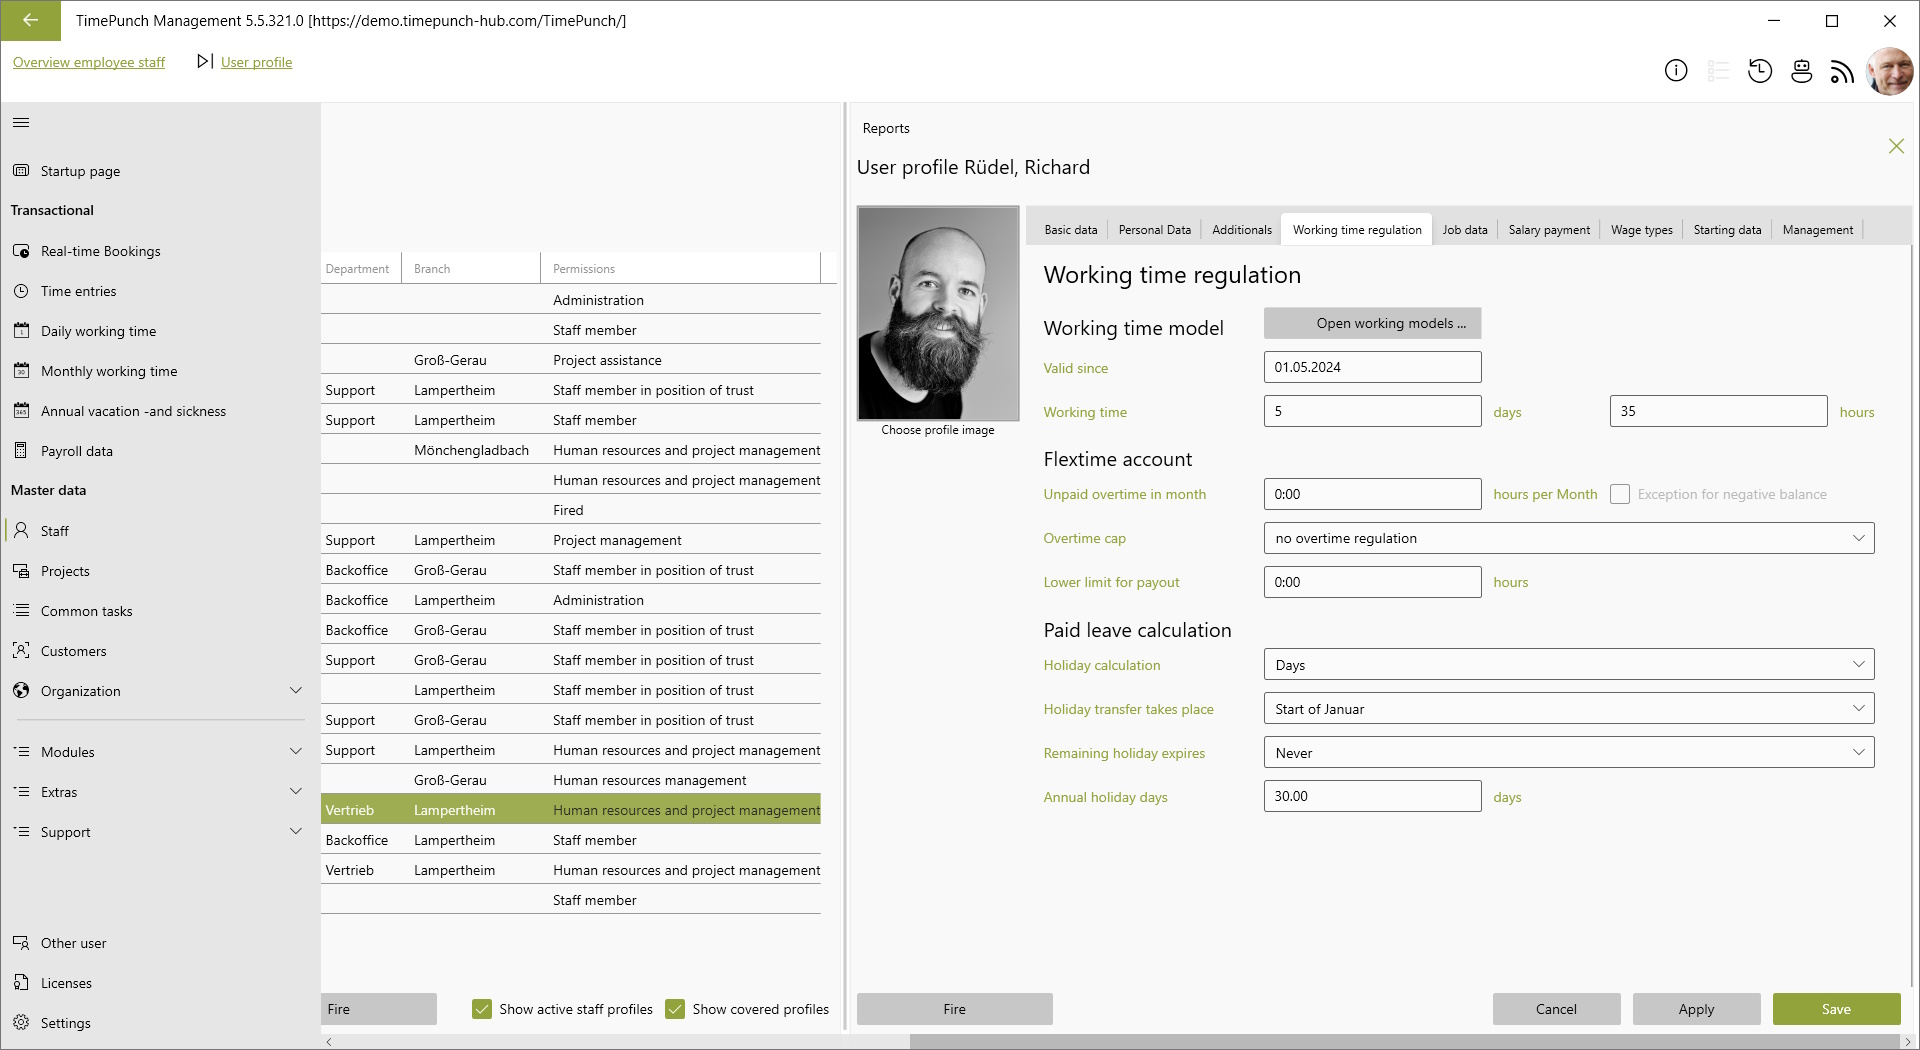
Working time regulation
In the "Working time regulation" tab on the "Edit employee" page, the settings regarding the working time model and overtime calculation are defined.
Note : This data refers to the current month and all subsequent months. If in already booked months, retroactively the holiday setting must be changed, then this is always done via the "Edit month-end closing" on the "Monthly working time" page.
Flexitime account
Overtime compensation can be defined under the heading "Flexitime account". This concerns first of all the so-called compensation regulations.
Unpaid overtime per month
Here you can specify how much overtime is already included in the employment contract. Only after the specified number of overtime hours is the overtime counted as overtime and credited to the flexitime account.
Upper limit for overtime
If desired, overtime can be limited per month or in total.
Limit monthly hours only: Employees may only accumulate a limited number of overtime hours per month, but no limit in total.
Limit accumulated overtime : Employees may only accumulate a limited number of overtime hours in total.
All hours in excess of the limit are either discarded or automatically paid out if the "Overtime over the limit is automatically paid out" checkbox is ticked.
Lower limit for payout
The lower limit for overtime payout determines the value up to which the working time account can be reduced by paying out overtime.
Vacation calculation
In this section, you can define the vacation policy. The following settings are possible.
Calculation basis (days / hours) : Depending on your wishes, the annual leave can be calculated in days or hours. If the working time model is regularly stored with whole and half days, the calculation basis in days is recommended, as this variant is easier for employees to understand. In the case of irregular working time models, calculation on an hourly basis is more accurate, as the leave account is only debited with the actual leave hours.
Vacation carried forward (beginning of month) : In this area, you can select the month in which the vacation is to be carried forward. In Germany, annual leave is usually credited at the beginning of January. In Austria, however, the rule is that leave is credited on the employee's entry date. In this case, the month of the entry date can be chosen as the time to credit annual leave to the employee's leave account.
Remaining leave expires (end of month) : The second setting is to define when the remaining leave from the previous year expires. Here, too, there are different rules in each company that can range from Immediately to Never. As the annual vacation days the contractually fixed vacation days are to be used. If employees do not start at the beginning of the year, the remaining vacation days to date must be defined in the first year in the "Start dates" tab.
Working time models
The "Edit working time model" button on the "Edit employee*" page is used to edit the current working time model.

Important : The weekly working time results from the working time model and cannot be changed in the profile.
Start of work : The start of work in the working time model has no effect on the work to be done. However, if the employee does not sign off manually, the theoretical sign-off time is calculated from the work start and the planned hours.
Working time : The field "Working time" contains the target hours to be worked on the defined day.
Working time credit/deduction : In the "Working time credit/deduction" field, a daily working time credit or deduction can be defined. Depending on whether the time is entered in plus as a credit or negative as a deduction.
Booked as : The "Booked as" field defines whether a half day or a full day is to be deducted from the leave account when leave is booked.
Start and end of core working hours : If fixed core working hours are defined, these can be entered in the "Start and end of core working hours" fields. Core working times are working times at which employees must be present.
Dynamic target time
A dynamic target time can be stored in the working time model. This means that the daily target time is set equal to the actual working time. This can be useful if it is not known in advance how long employees are to work. This is very helpful e.g. in case of short-time work or in case of mini-jobbers.

The dynamic is activated by deleting the target time field completely. When changing to another field, the text "dynamic" will be displayed in the field "working hours". the text "dynamic" will be displayed. This makes the target time equal to the actual working time.
Salary payment
Depending on whether the employee works on the basis of a fixed salary or an hourly wage, the "Salary payment" tab will be displayed on the "Edit employee" page with the payment data for salary or wage.
The dialog for payroll based on fixed salary contains the monthly gross salary, as well as the employee's bank details.

Wage payment
The Payroll tab on the Edit employee page contains the payroll data when employees are paid by hourly wage.
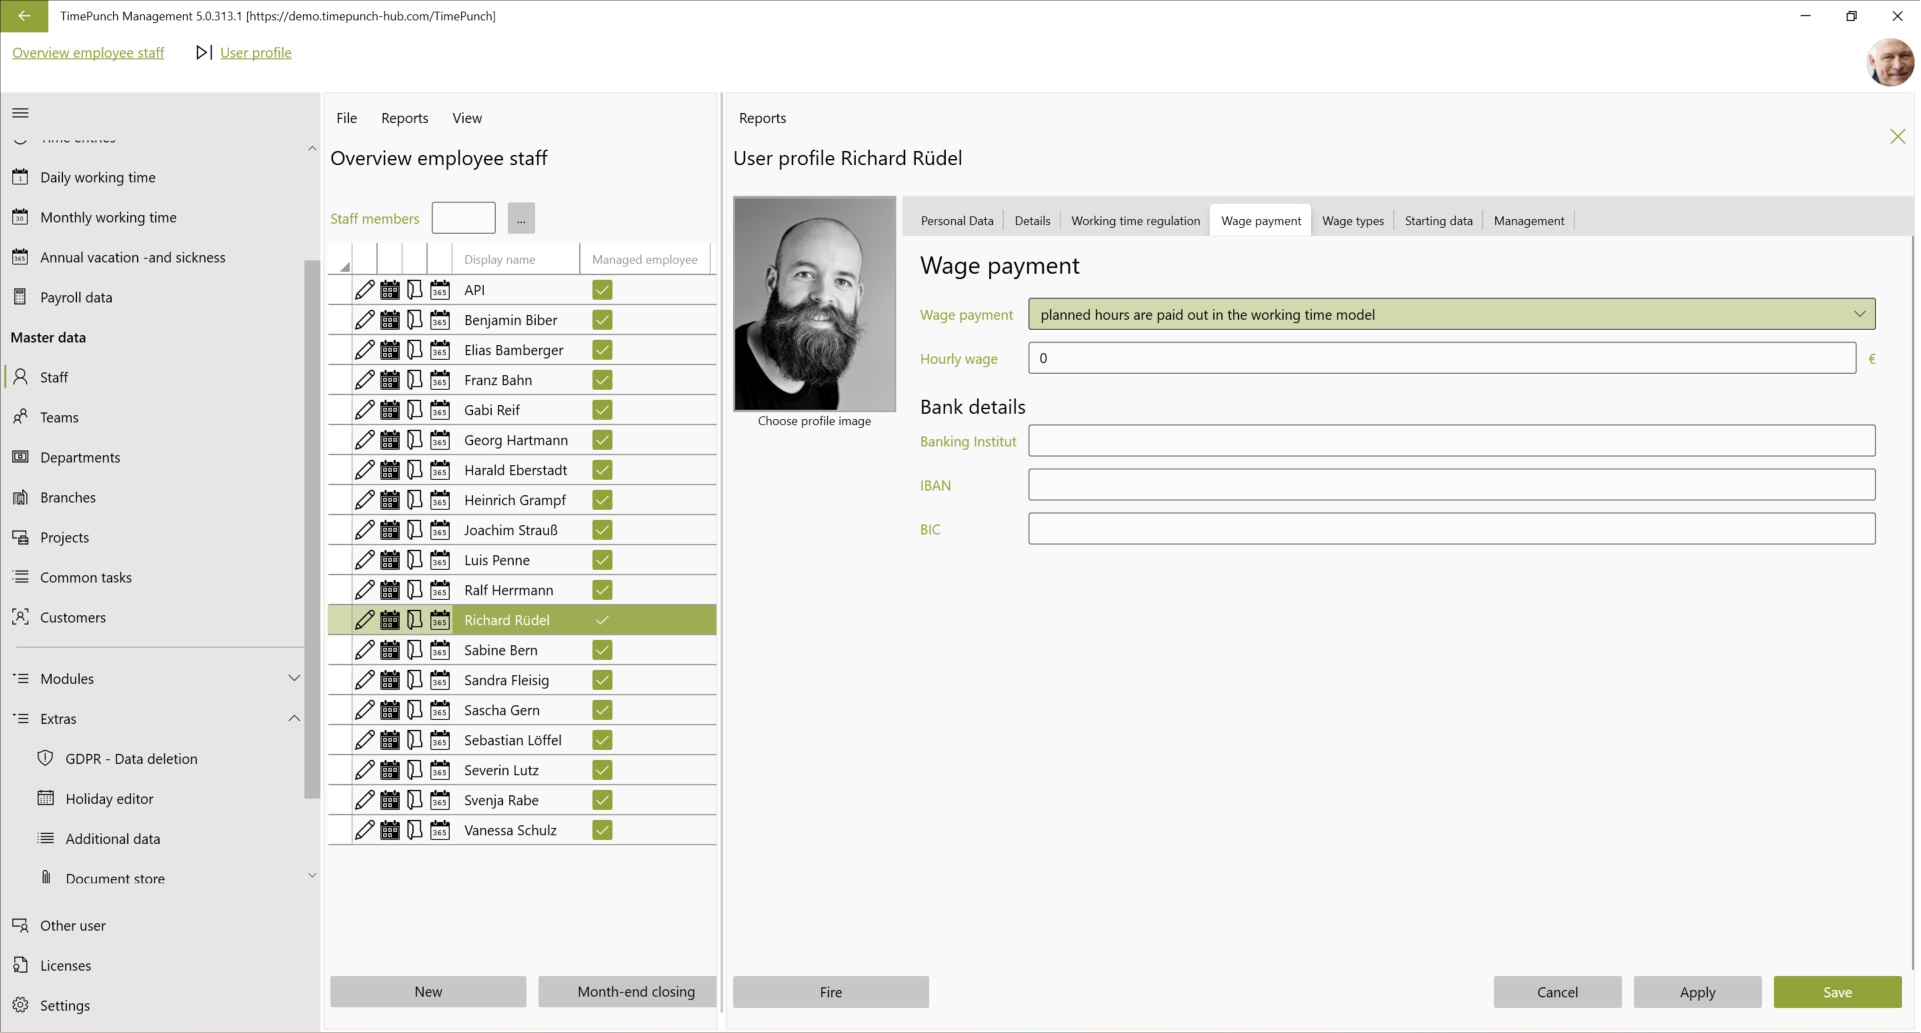
In TimePunch there are several ways how and according to which rules the payment of wages can be done.
Paying the target hours in the working time model : The paid wage is based on the target hours of the employee the working time model. I.e. in a month with 31 days the employee receives a higher wage than in a short month with only 30 or 28 days.
The number of hours paid is always identical and fixed. This type of wage payment is often used by companies that always pay their employees the same number of hours.
Paid a fixed number of hours until lower limit is reached : This payment is identical to the previous one. The difference, however, is that the payment is made only until the overtime (or missing hours) reaches a lower limit.
Booked hours are paid out, up to the max. target number of hours : The number of hours paid out is variable and depends on the employee's actual working hours. In concrete terms, this means that with this option not only the actual hours worked are paid out, but also any reduction in overtime through time off in lieu is taken into account directly in the salary payment. If employees work more hours than can be paid out, these hours are credited to the overtime account. The accumulated overtime can then be paid out manually at a later date or cancelled as time off in lieu.
Payroll with regular holiday work
Paying hourly wages with regular holiday work means that holidays do not automatically count as time off. An example of this is employment as a shift worker.
Shift workers are allowed to take the working time released by the holiday on a day other than the holiday as special leave. Therefore, with this setting, the holiday will be displayed as a regular working day with the corresponding target time.
Wage types
The default wage types and bonus times used by TimePunch are created in the program settings under "Wage types".
If the wage types used for an employee should differ, then so-called specific wage types can also be stored directly for the employee. The tab "Wage types" on the page "Edit employee" is used for this purpose.
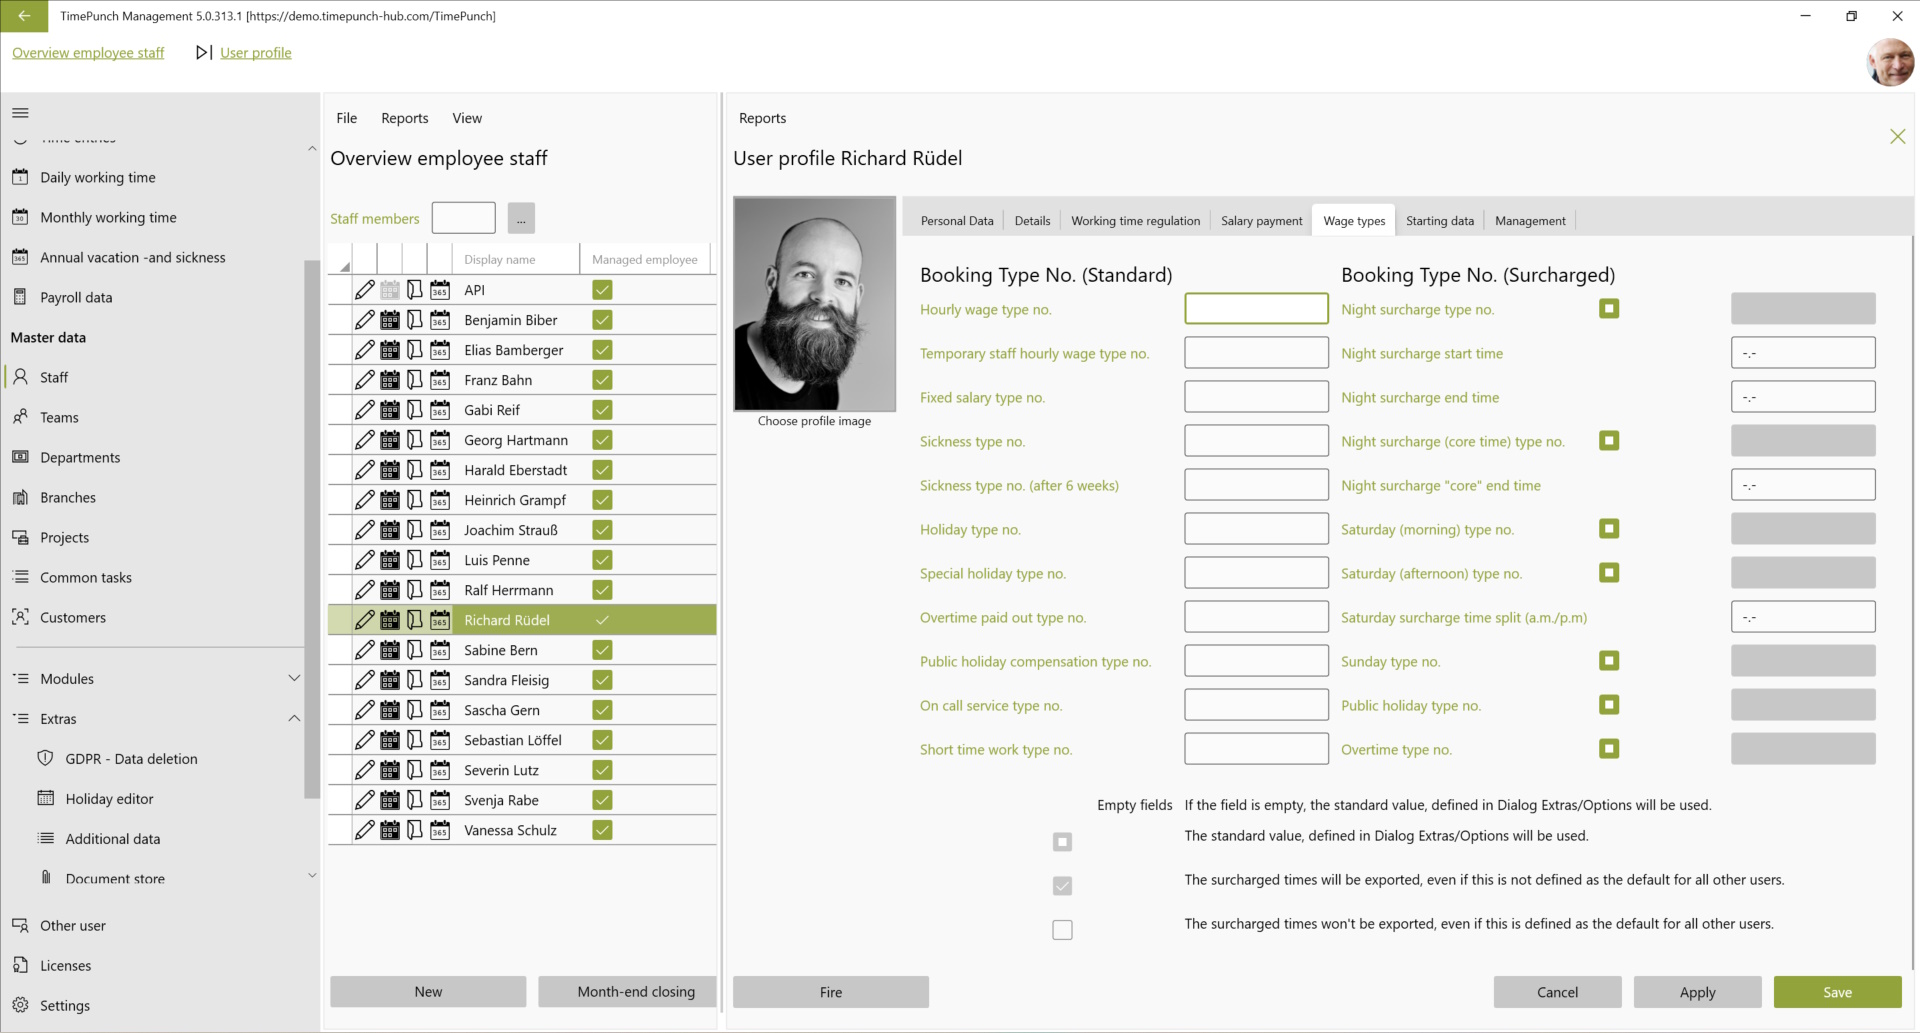
It is important that for empty fields or fields with a filled rectangle, the assignment from the settings is used.
Example 1:
In the settings, the wage type "1200" is stored for the hourly wage. The wage type "Hourly wage" is not filled for the employee. As a result, the hours are posted to wage type 1200 because the default has not been overwritten.
Example 2:
A night bonus is set in the settings. These hours are posted to wage account 2000 in the options. The checkmark for night bonus has been explicitly removed for the employee. As a result, all employees receive a night bonus, except for the employee, for whom the checkmark for night bonus has been removed.
Example 3:
In the settings, no account is set for Sunday and holiday. The employee, on the other hand, has an account for Sunday and holiday. As a result, only the employee who has an entry for Sunday and holiday will receive the Sunday and holiday bonus. All other employees will not receive the surcharge because the corresponding field has not been filled in the settings.
Entry data
In the "Entry data" tab on the "Edit employee*" page, the overtime, sick days and remaining vacation days accumulated up to the switch to TimePunch are entered.

If an employee starts during the year, the remaining vacation days must be entered in the "Entry Data" tab on the "Edit Employee" page. Example: The employee has an annual leave of 30 days, but starts in the company in July. In this case, 15 remaining vacation days for the first year should be set in the entry data.
The same applies if employees have remaining vacation days and these are to be transferred to the start of TimePunch.
Administration
In the last tab "Administration" on the page "Edit employee*" the authorization of the employee is defined and the login password is set.
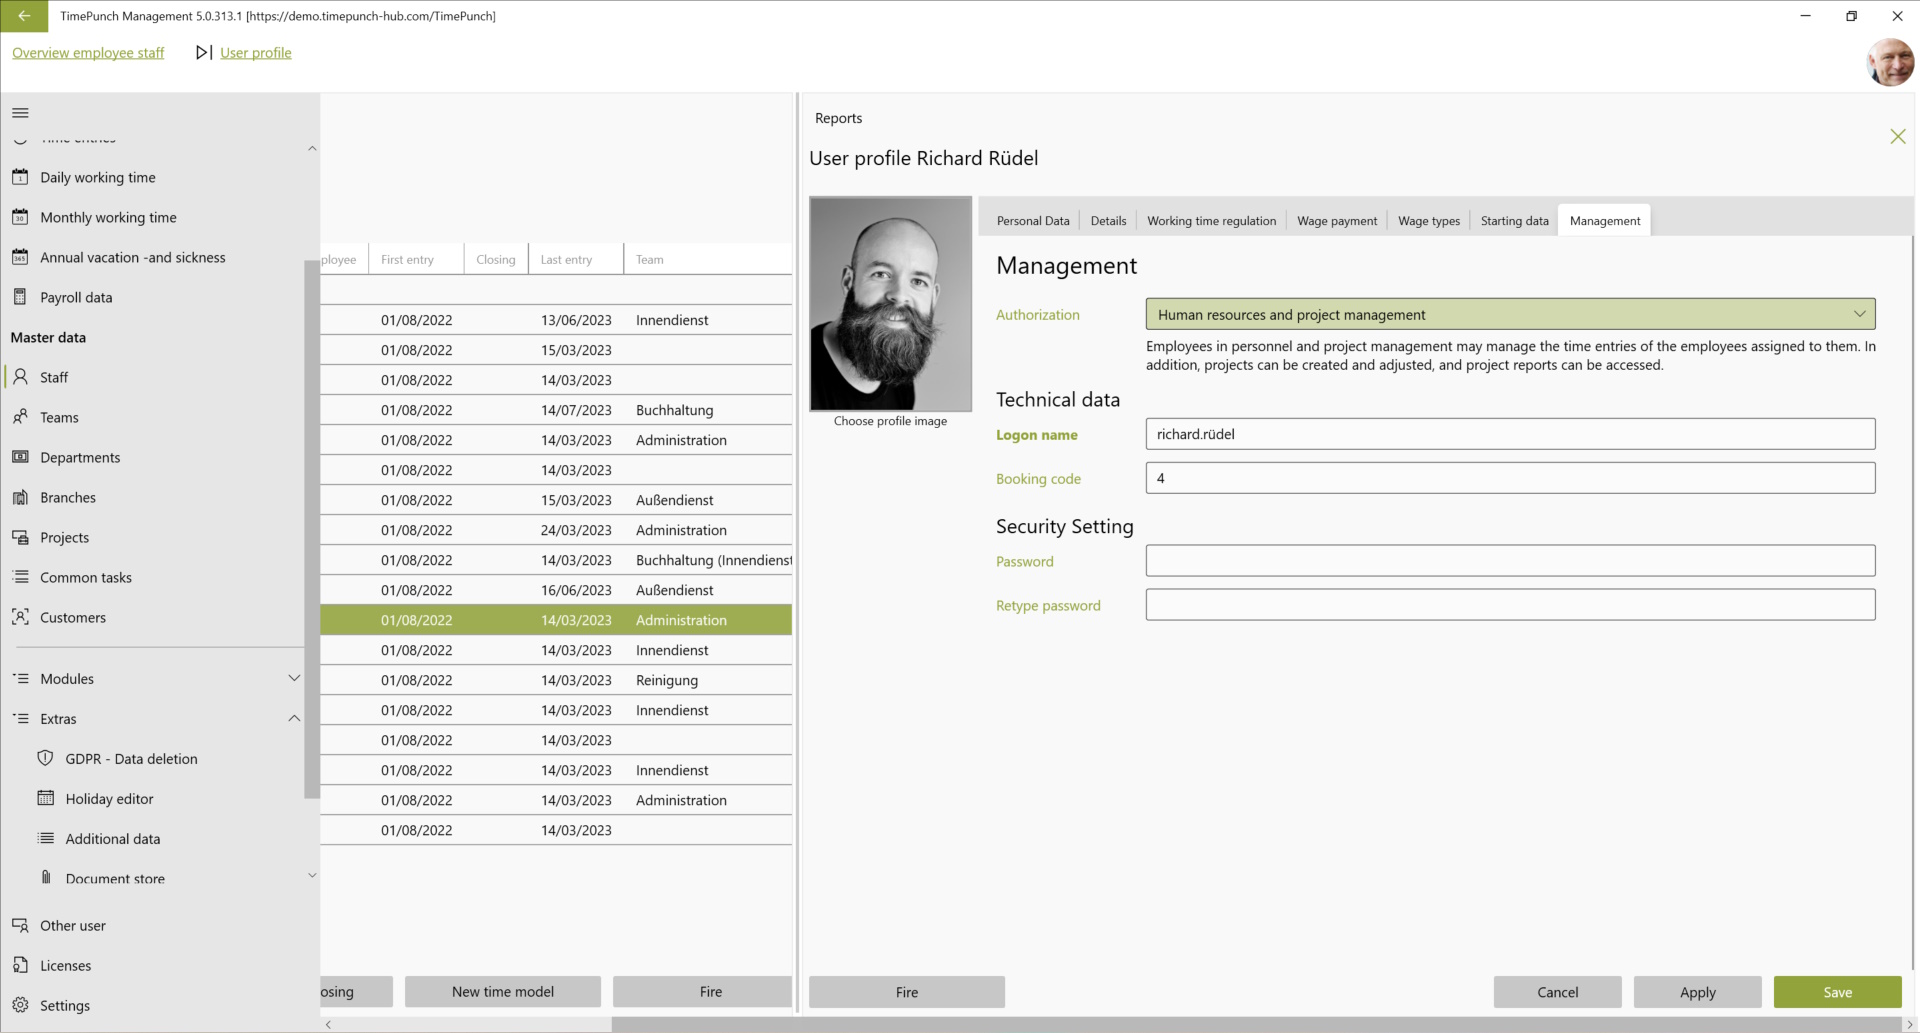
Tip : In order for new employees to log in to the system, it is necessary to set a start password for the employee. The password for an employee can be set in the "Administration" tab on the "Edit employee" page.
Tip: If an employee is locked (e.g. by entering the wrong password several times), then setting a new password will unlock the password.